Support & Resistance
Support and resistance indicators identify key price levels where buying or selling pressure is likely to appear. This category includes both classical techniques (Fibonacci, Golden Zone) and Smart Money Concepts (SMC) / ICT methods (Order Blocks, Liquidity Sweeps, etc.). Most of these are real-time — they react to structural price action rather than smoothing history — though they often have a confirmation delay while waiting for swing points to be validated.
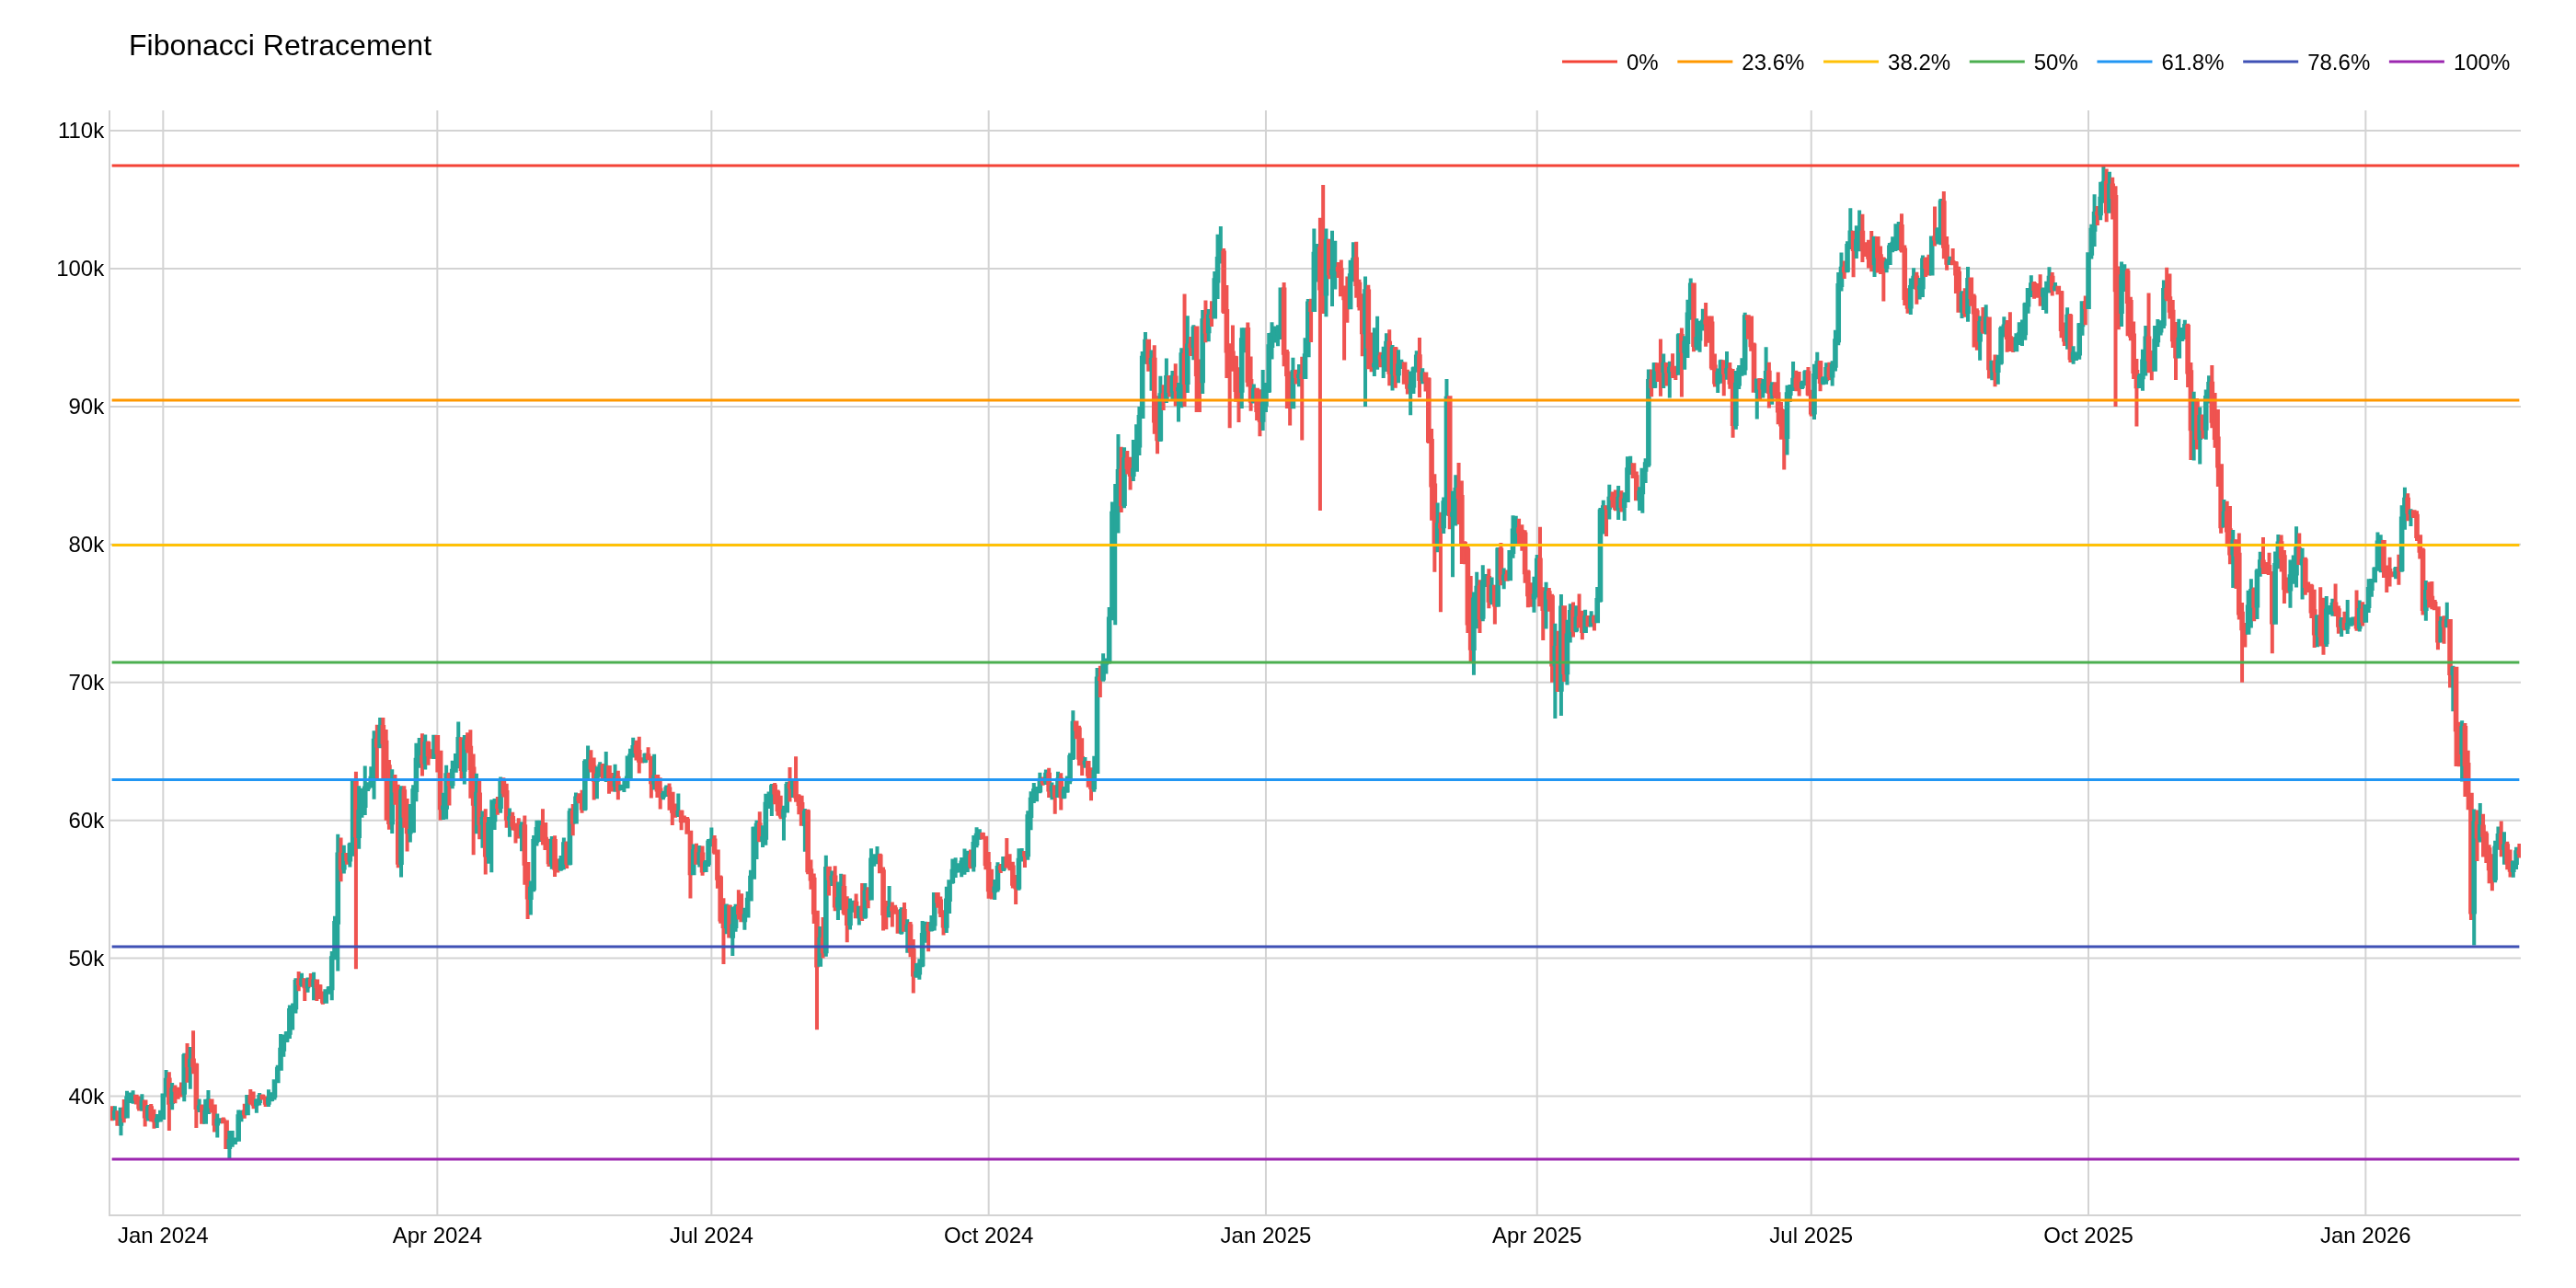
Fibonacci Retracement
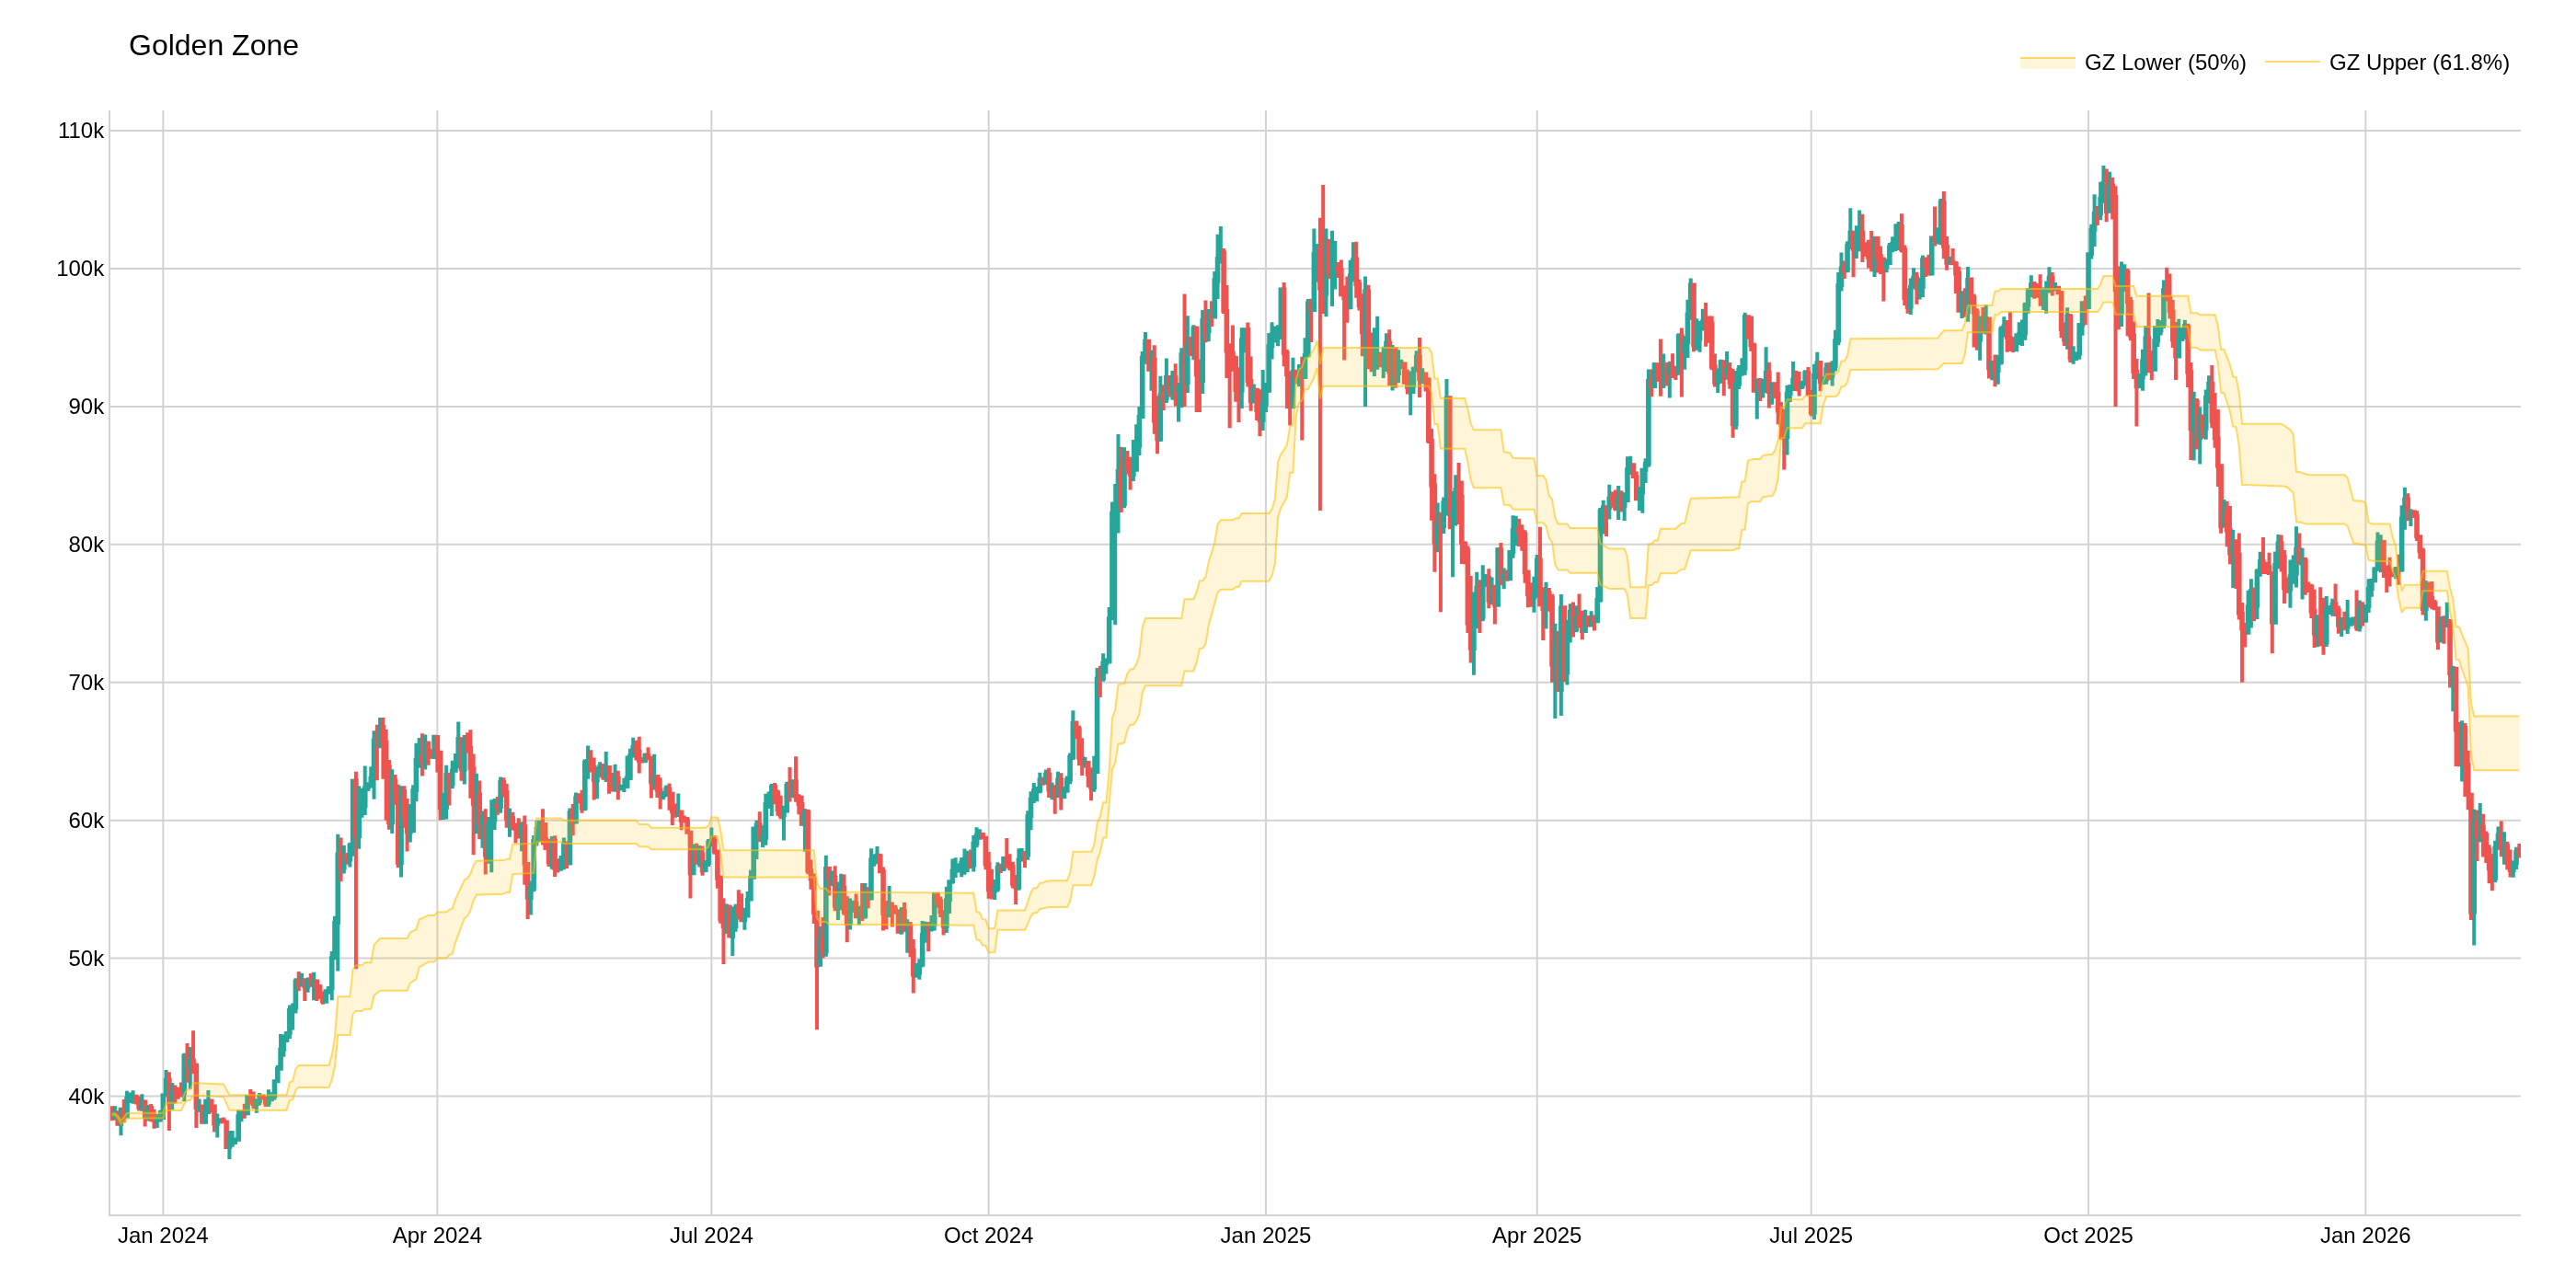
Golden Zone

Golden Zone Signal
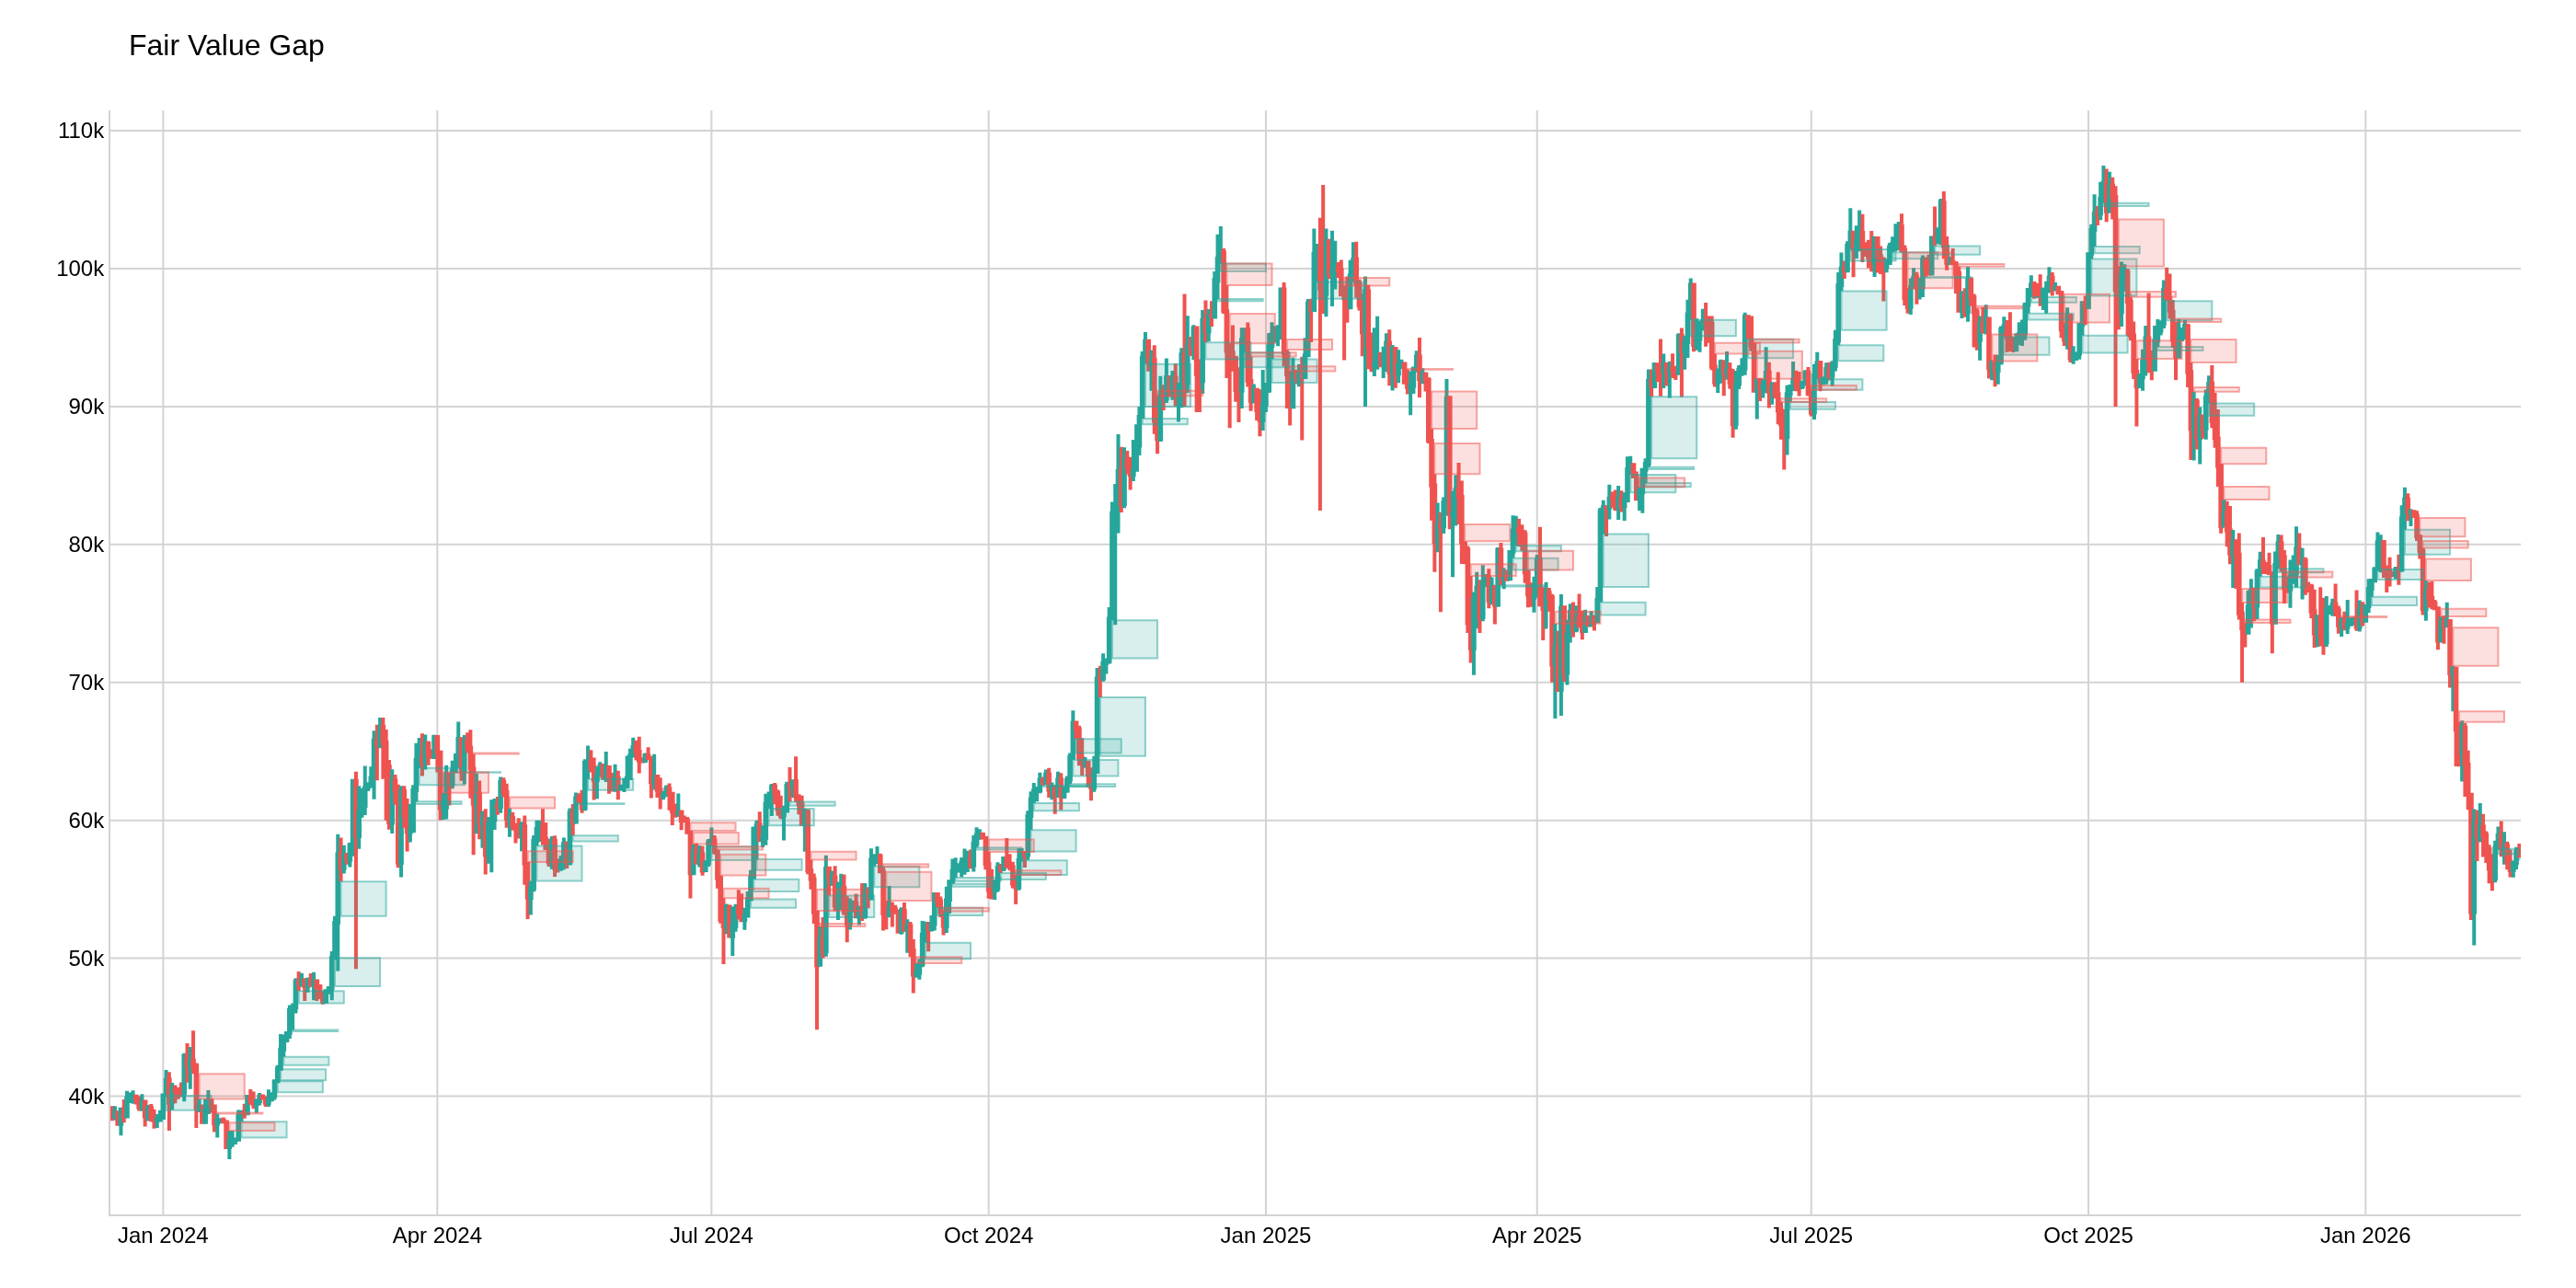
Fair Value Gap (FVG)
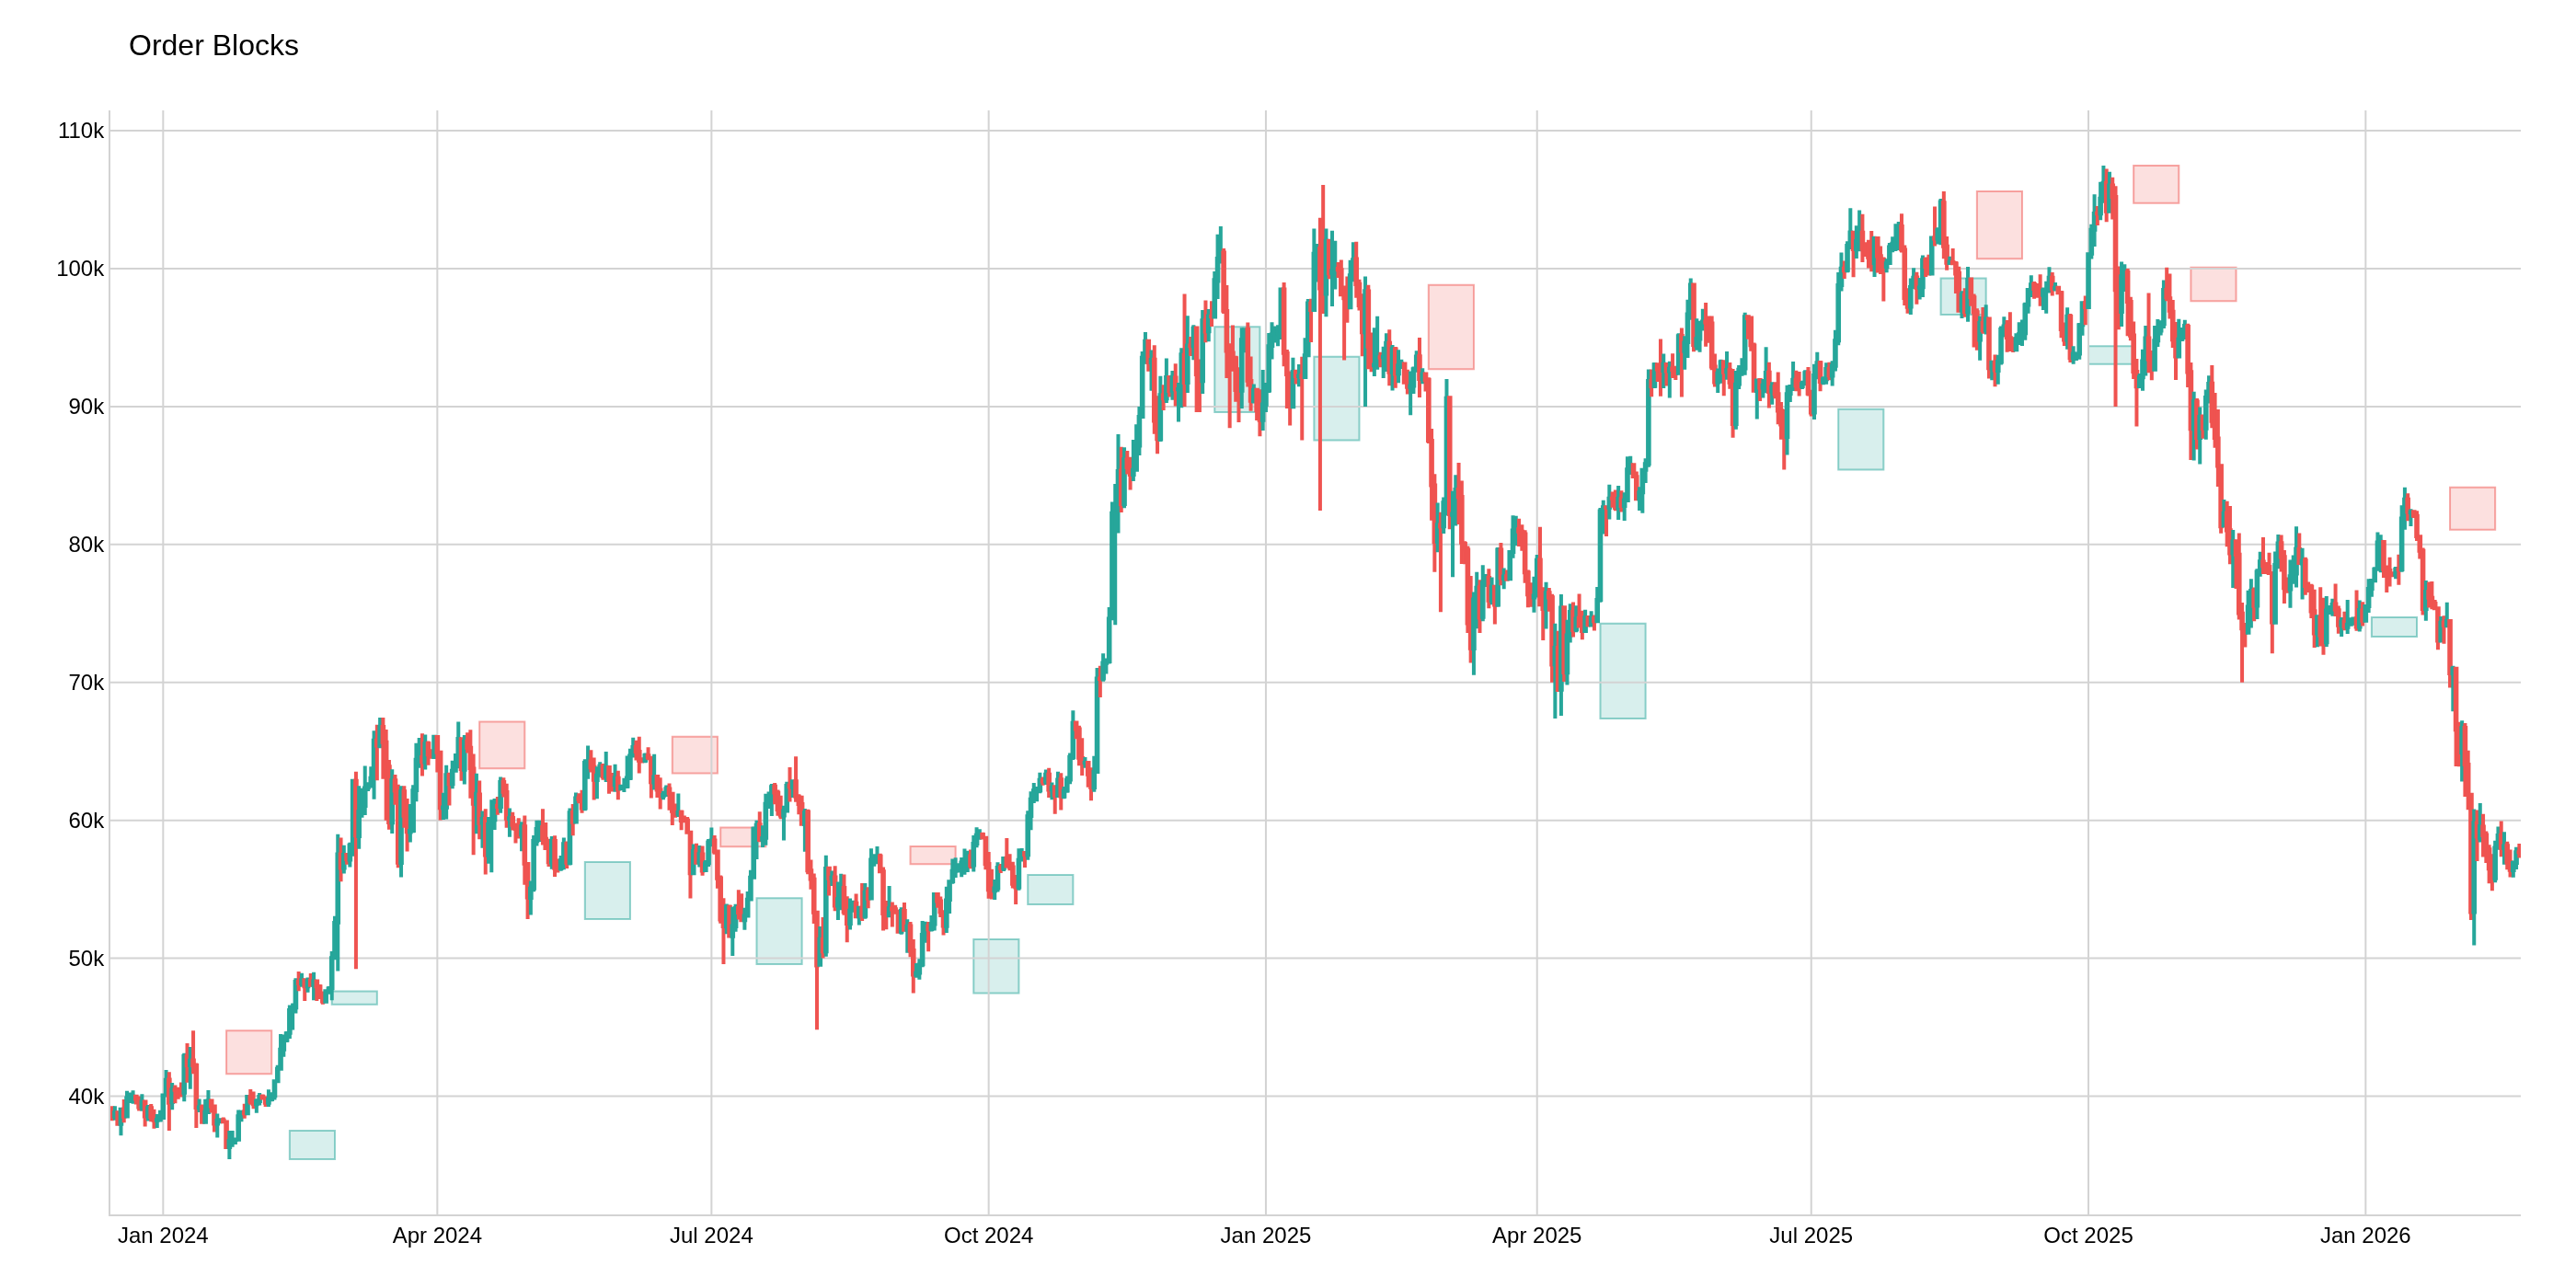
Order Blocks
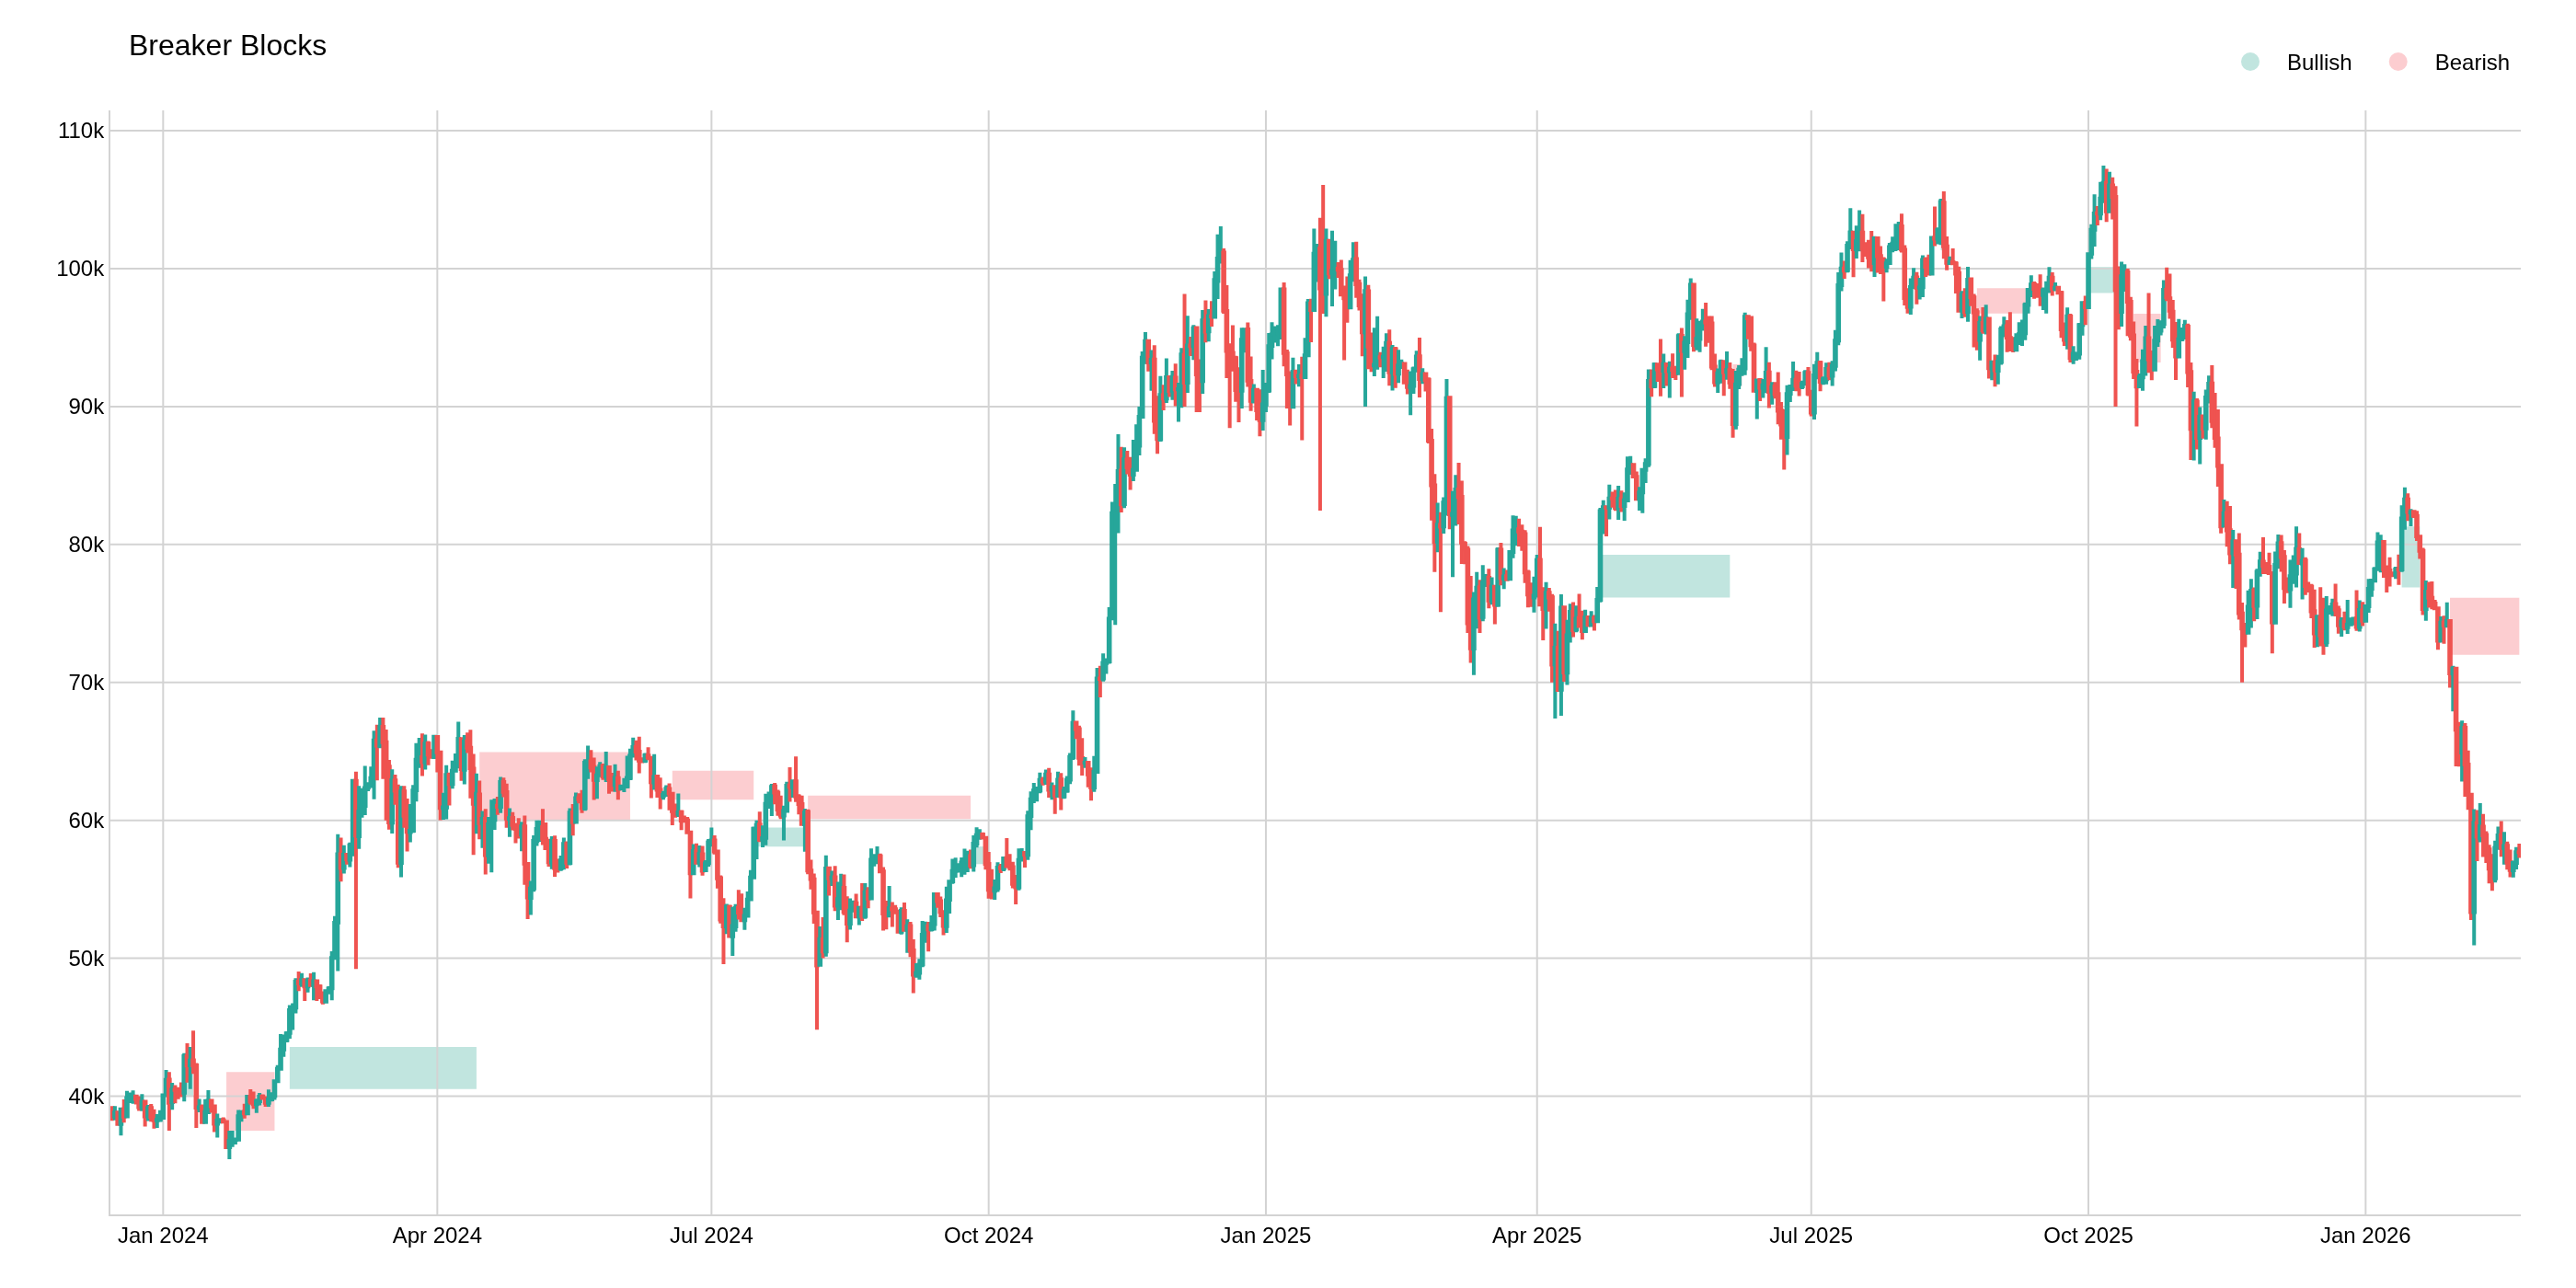
Breaker Blocks
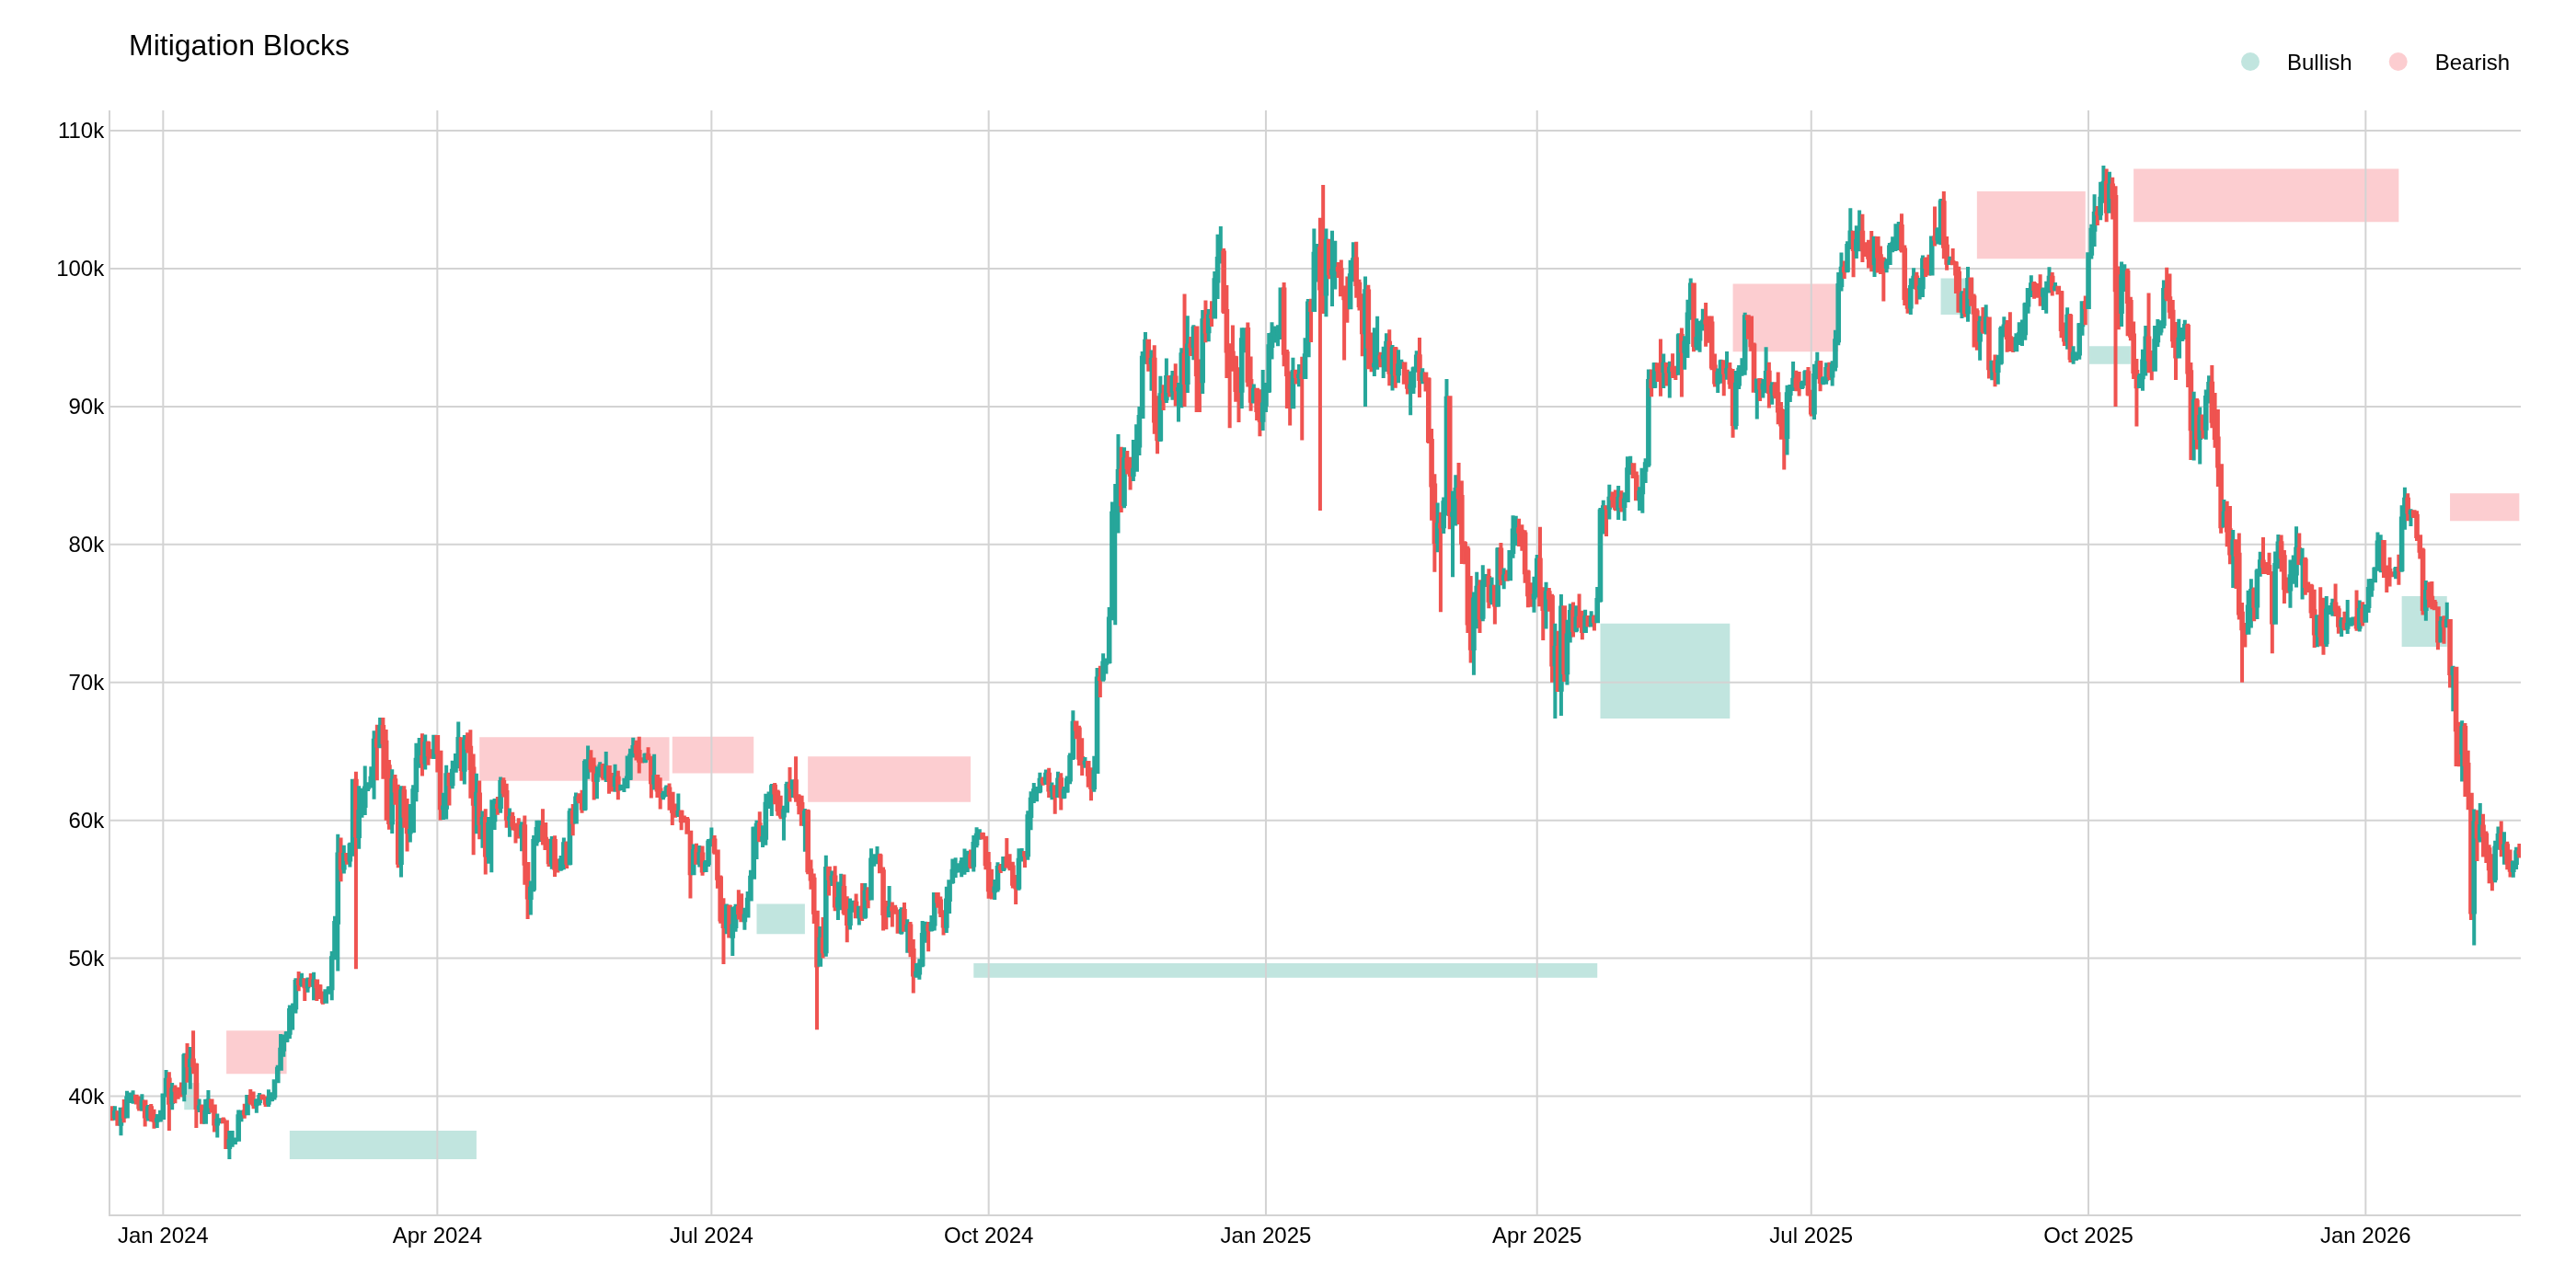
Mitigation Blocks
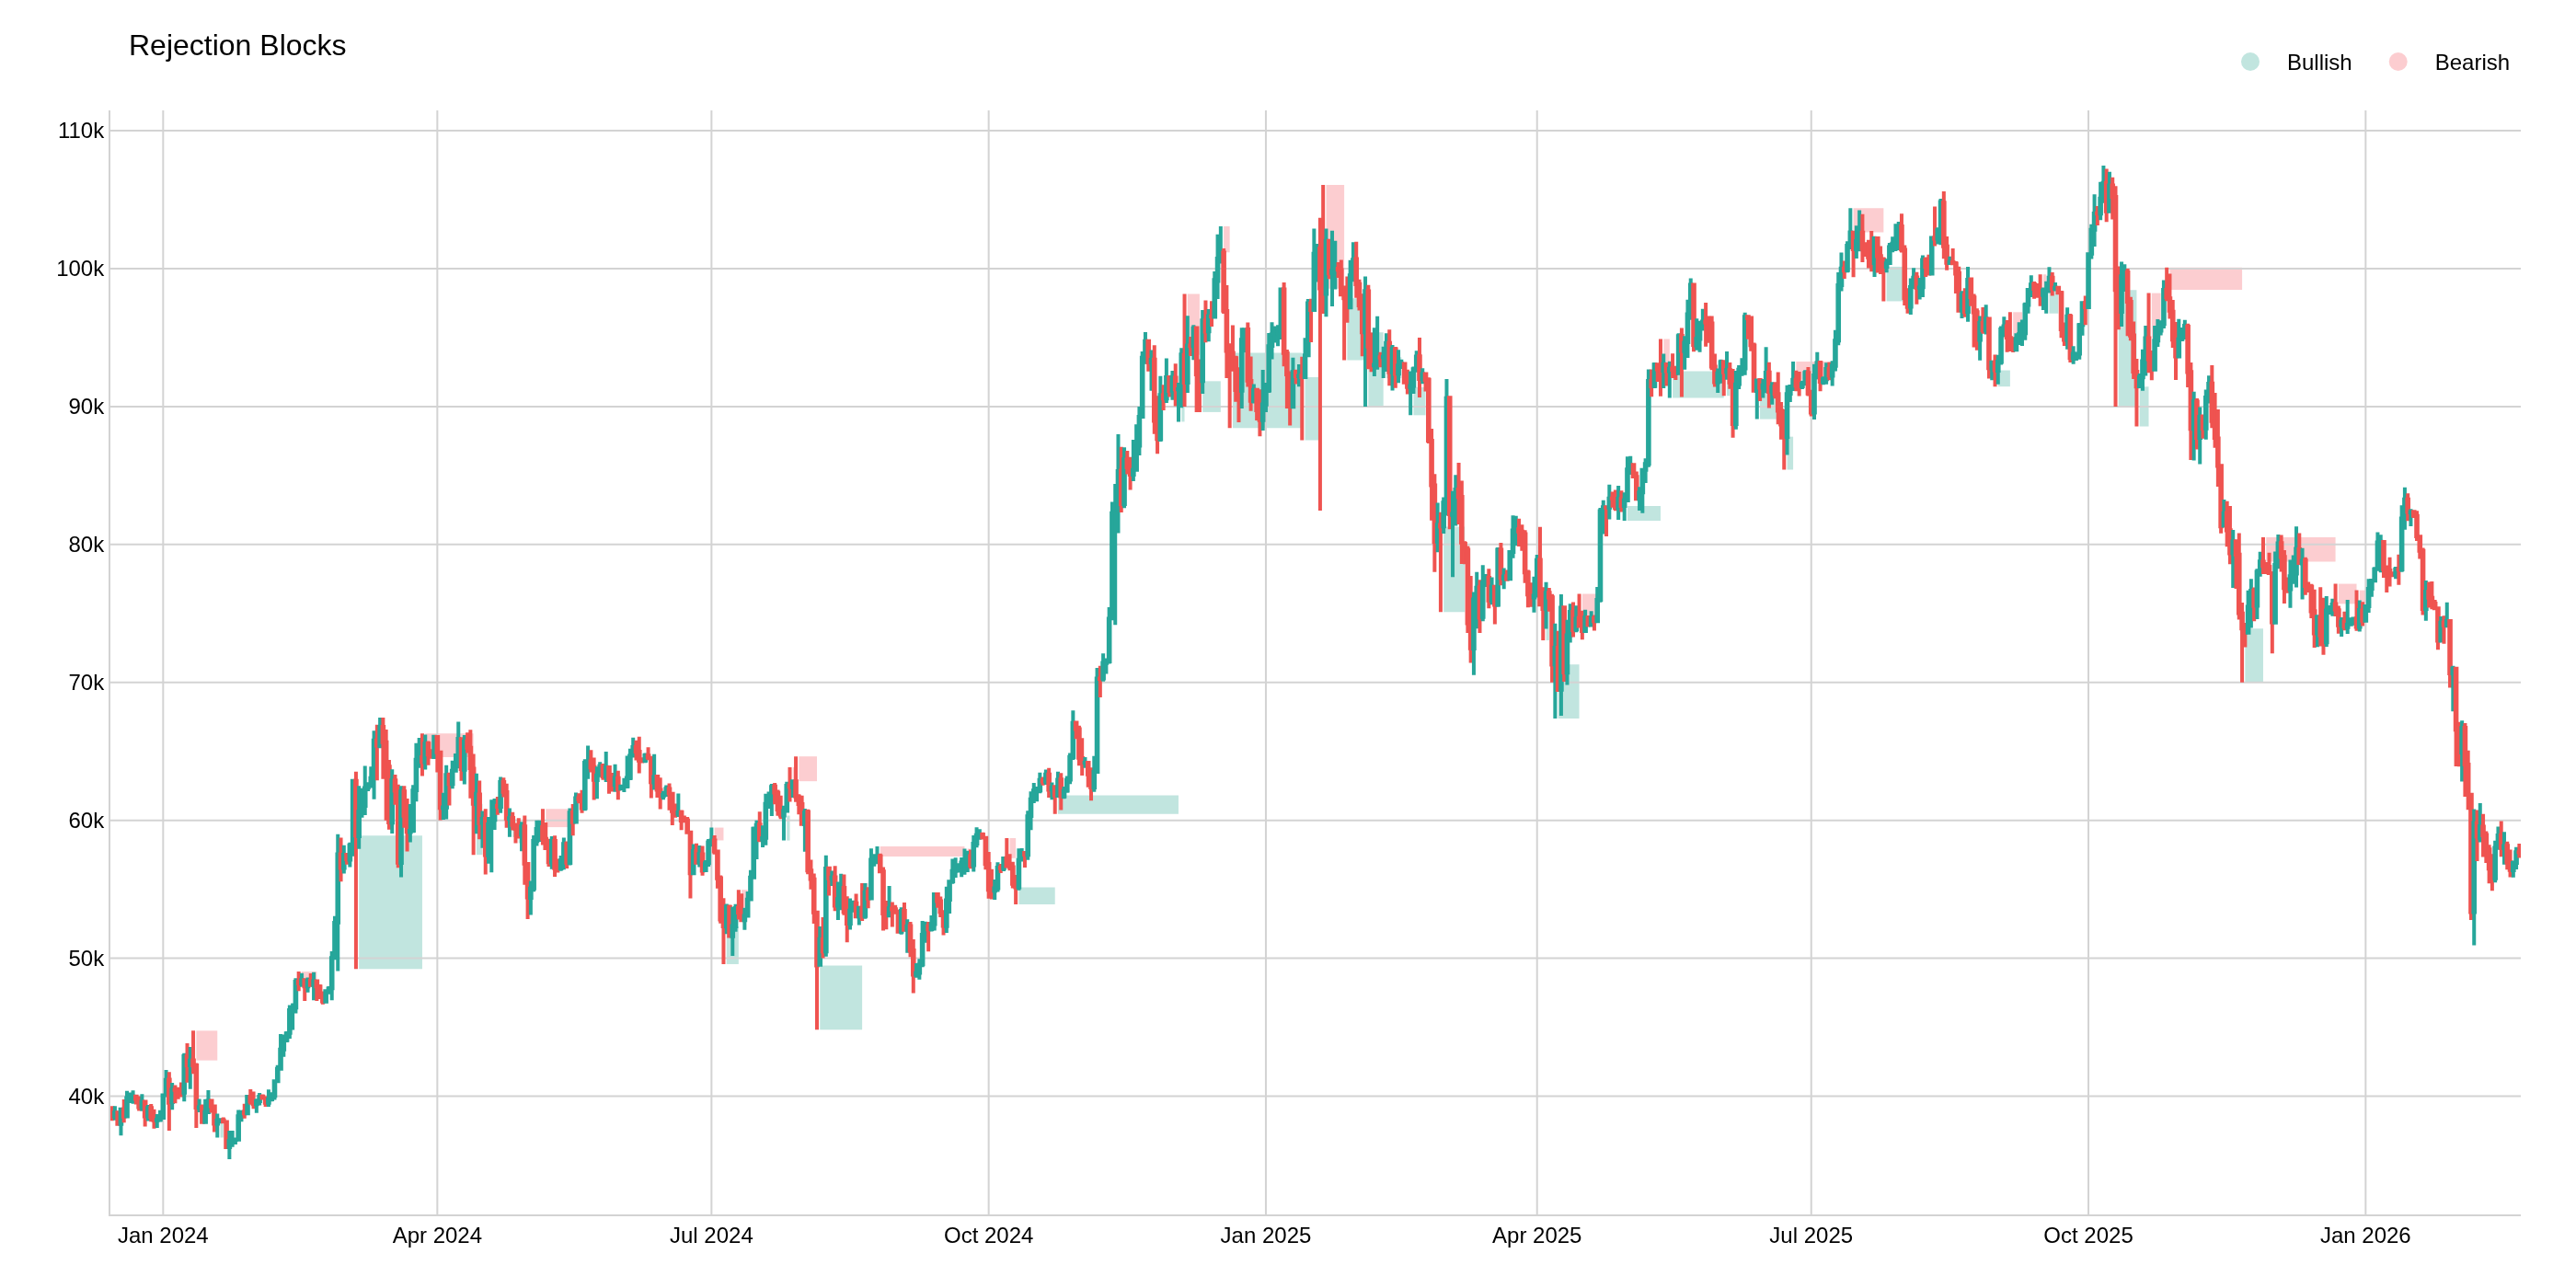
Rejection Blocks
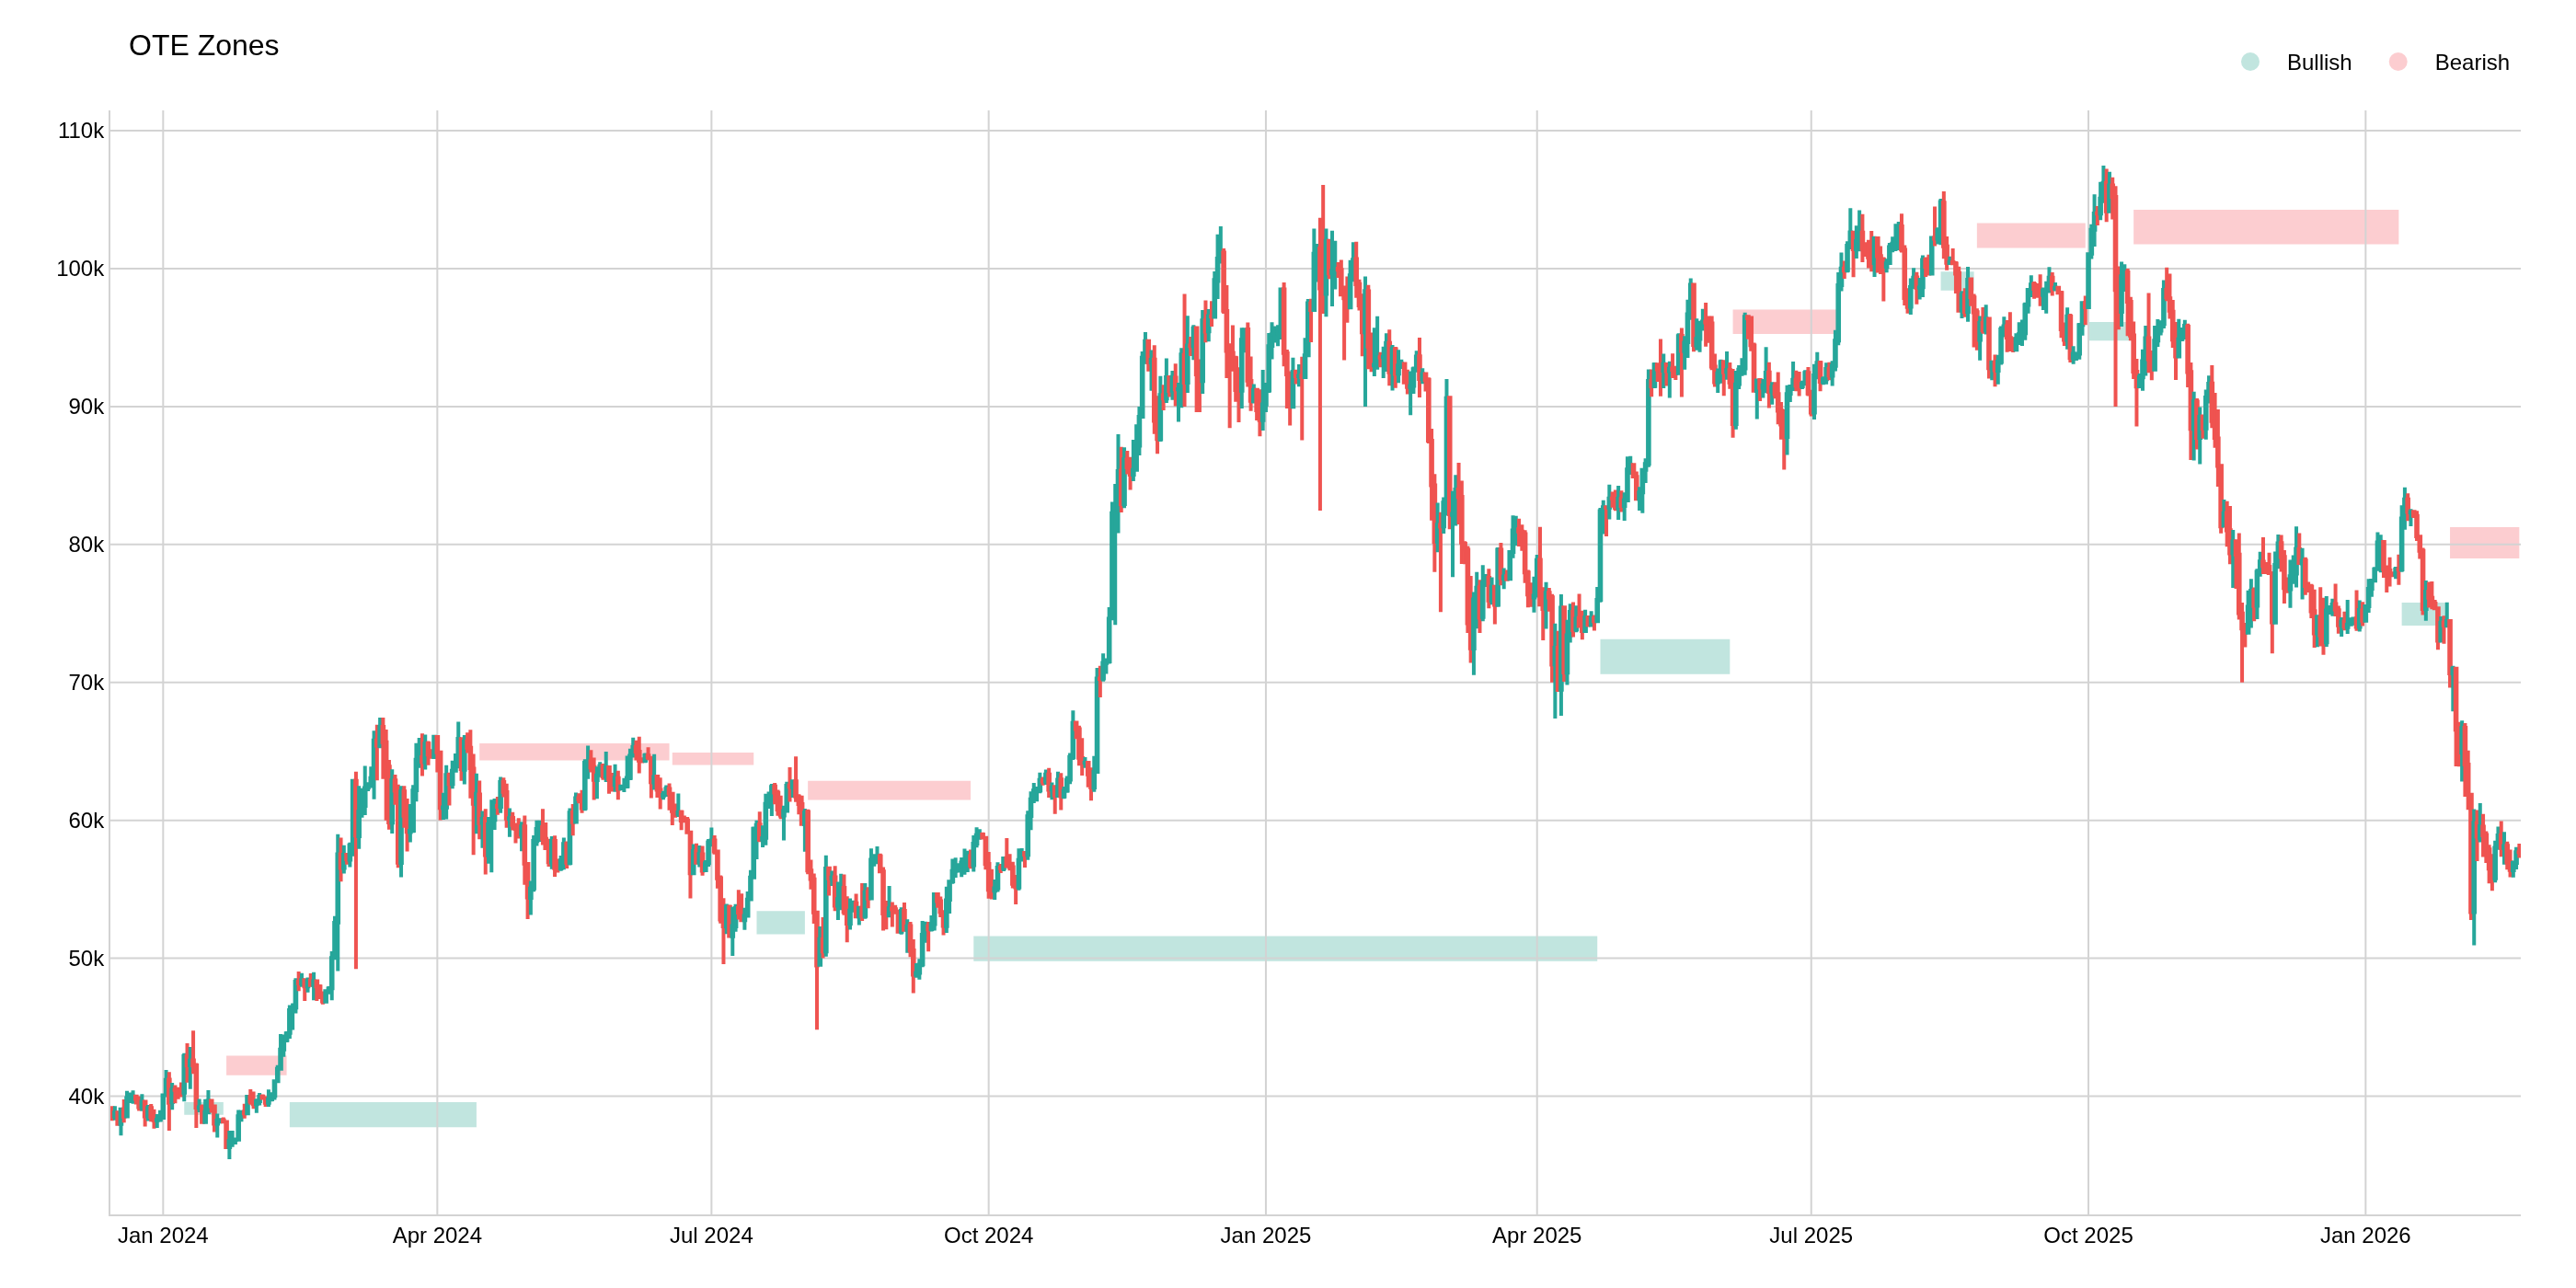
Optimal Trade Entry (OTE)
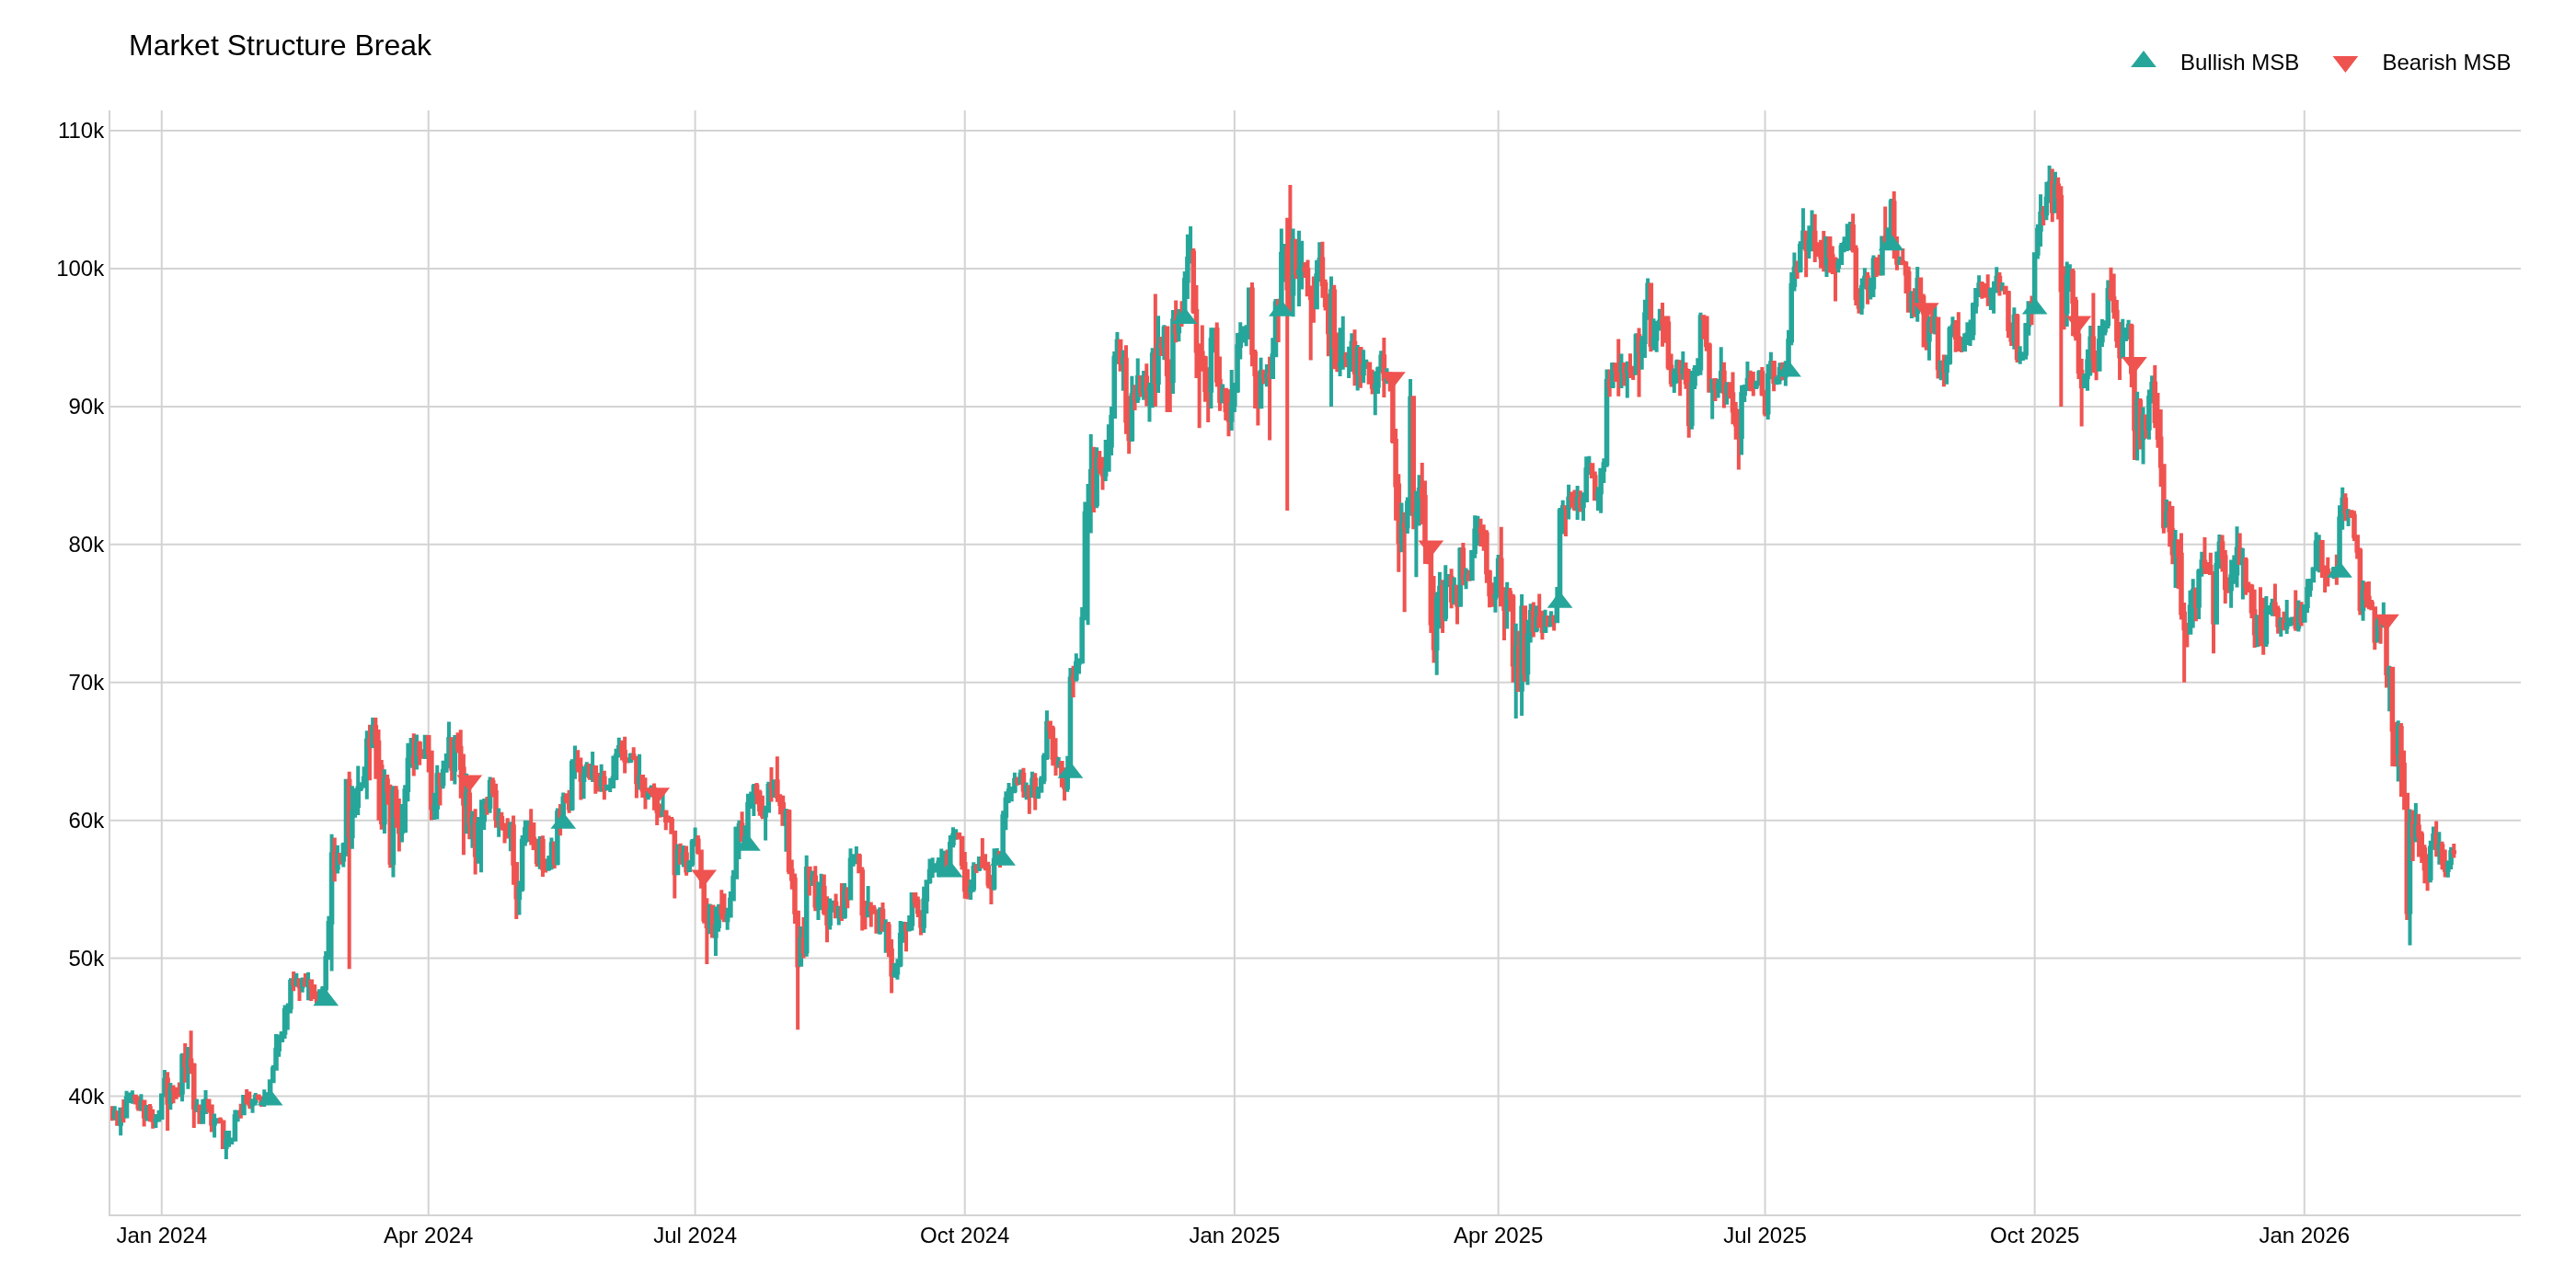
Market Structure Break
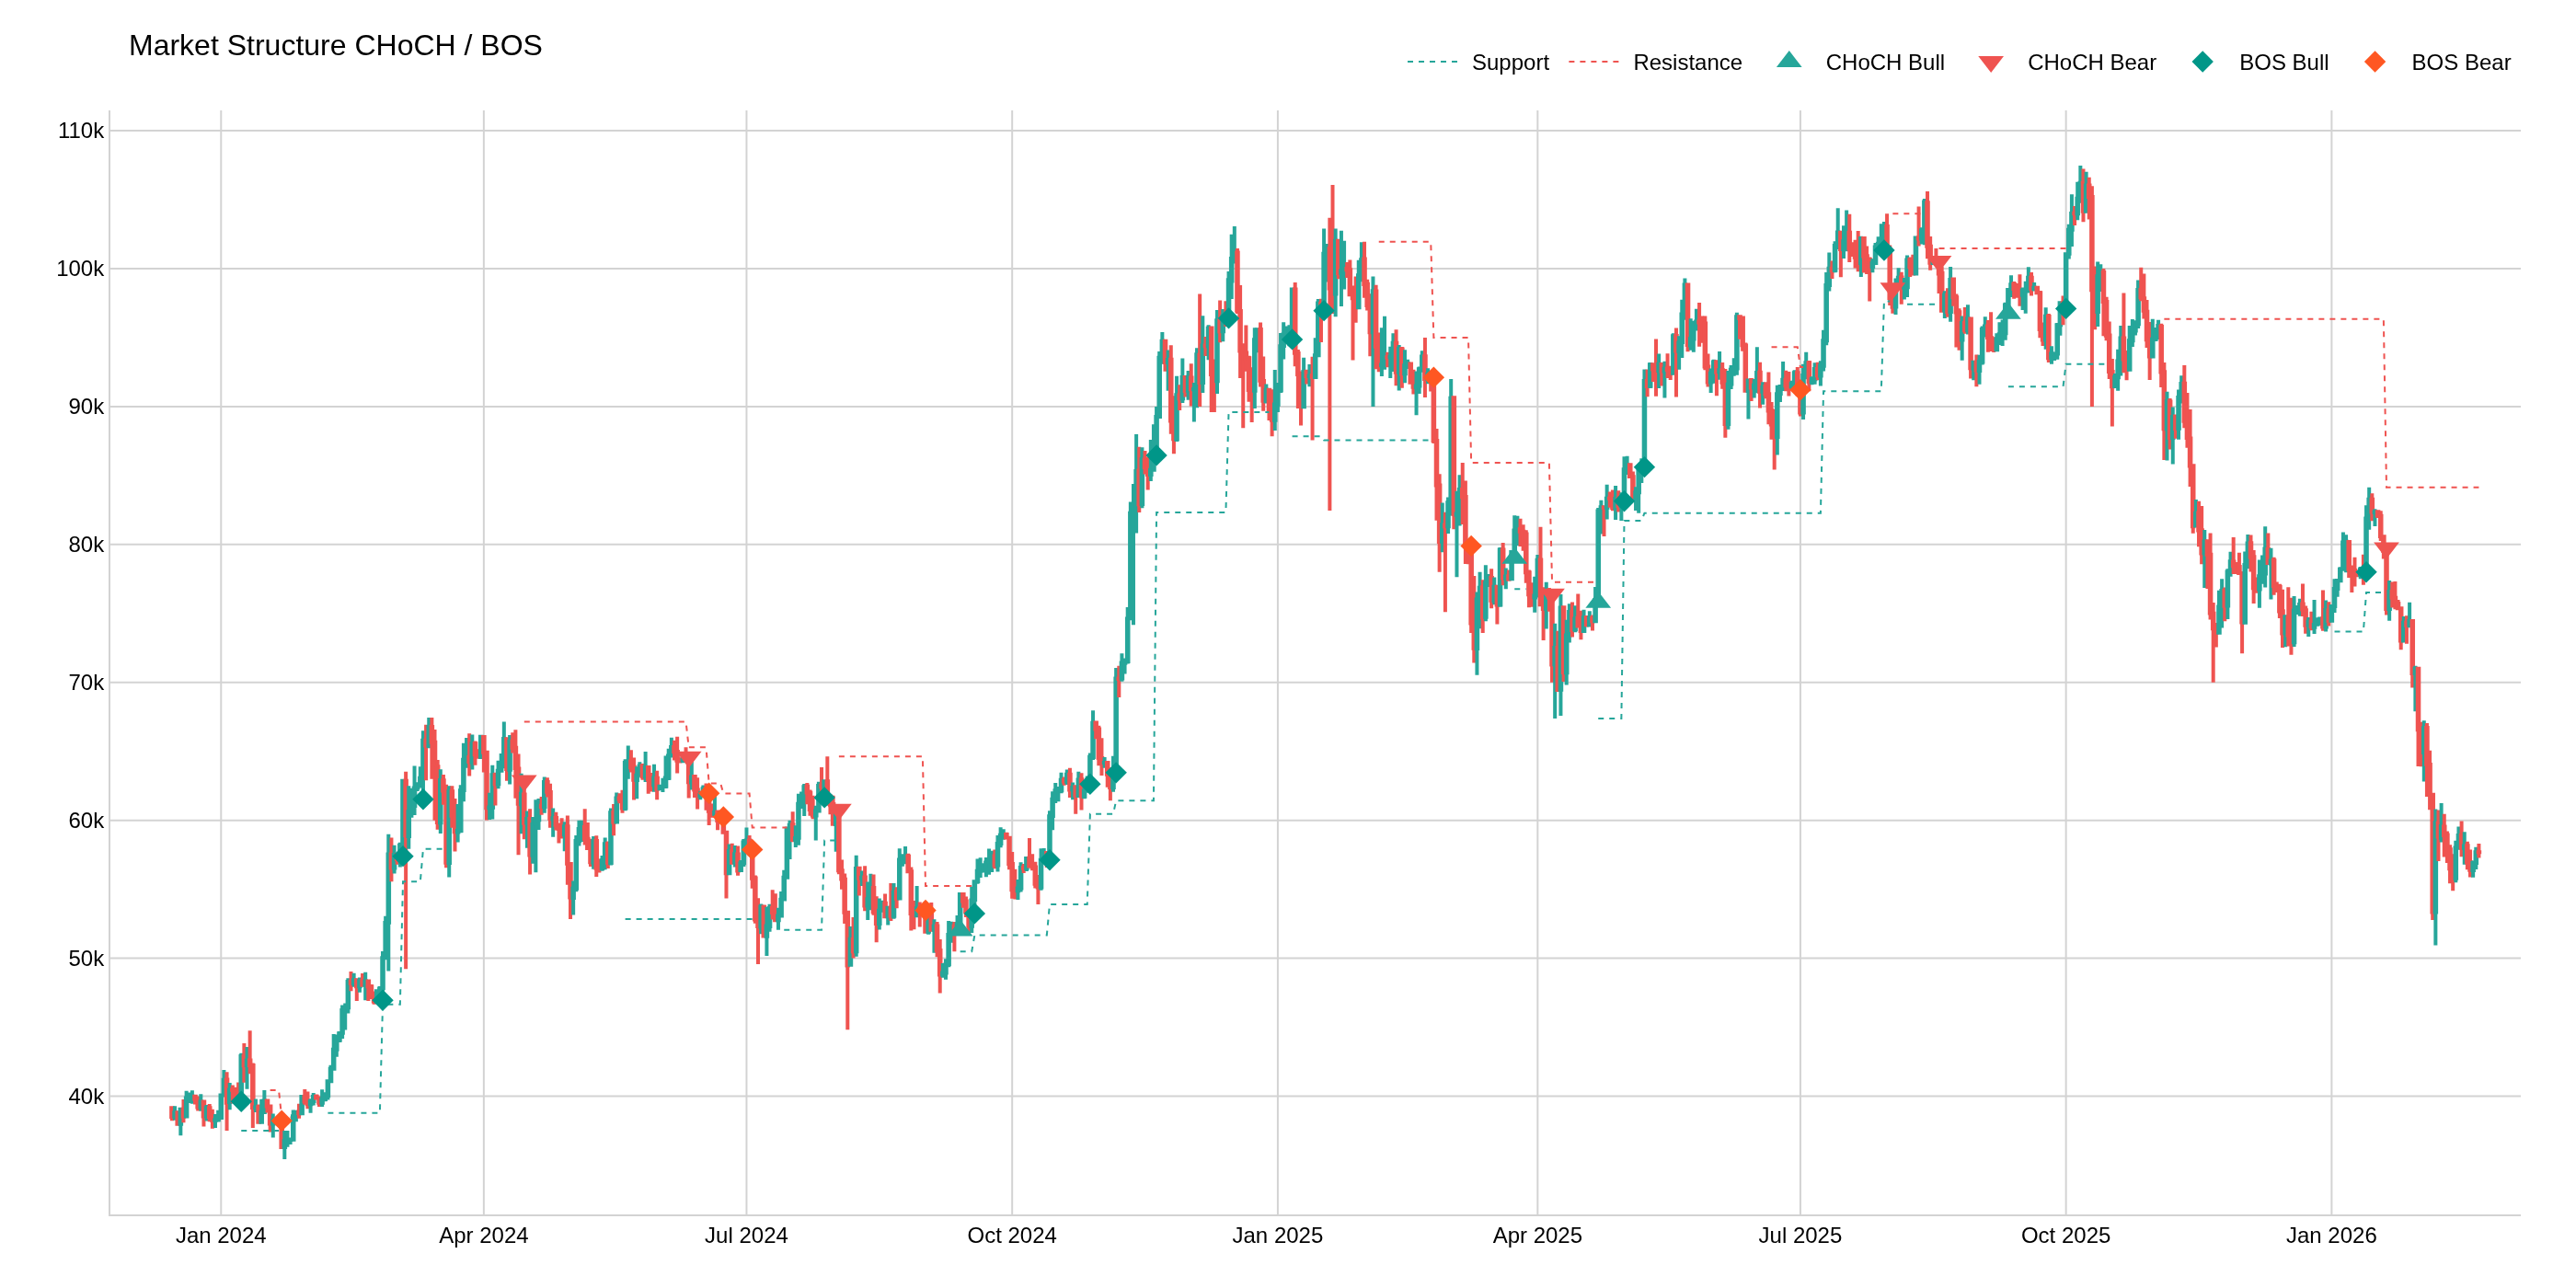
Market Structure CHoCH/BOS
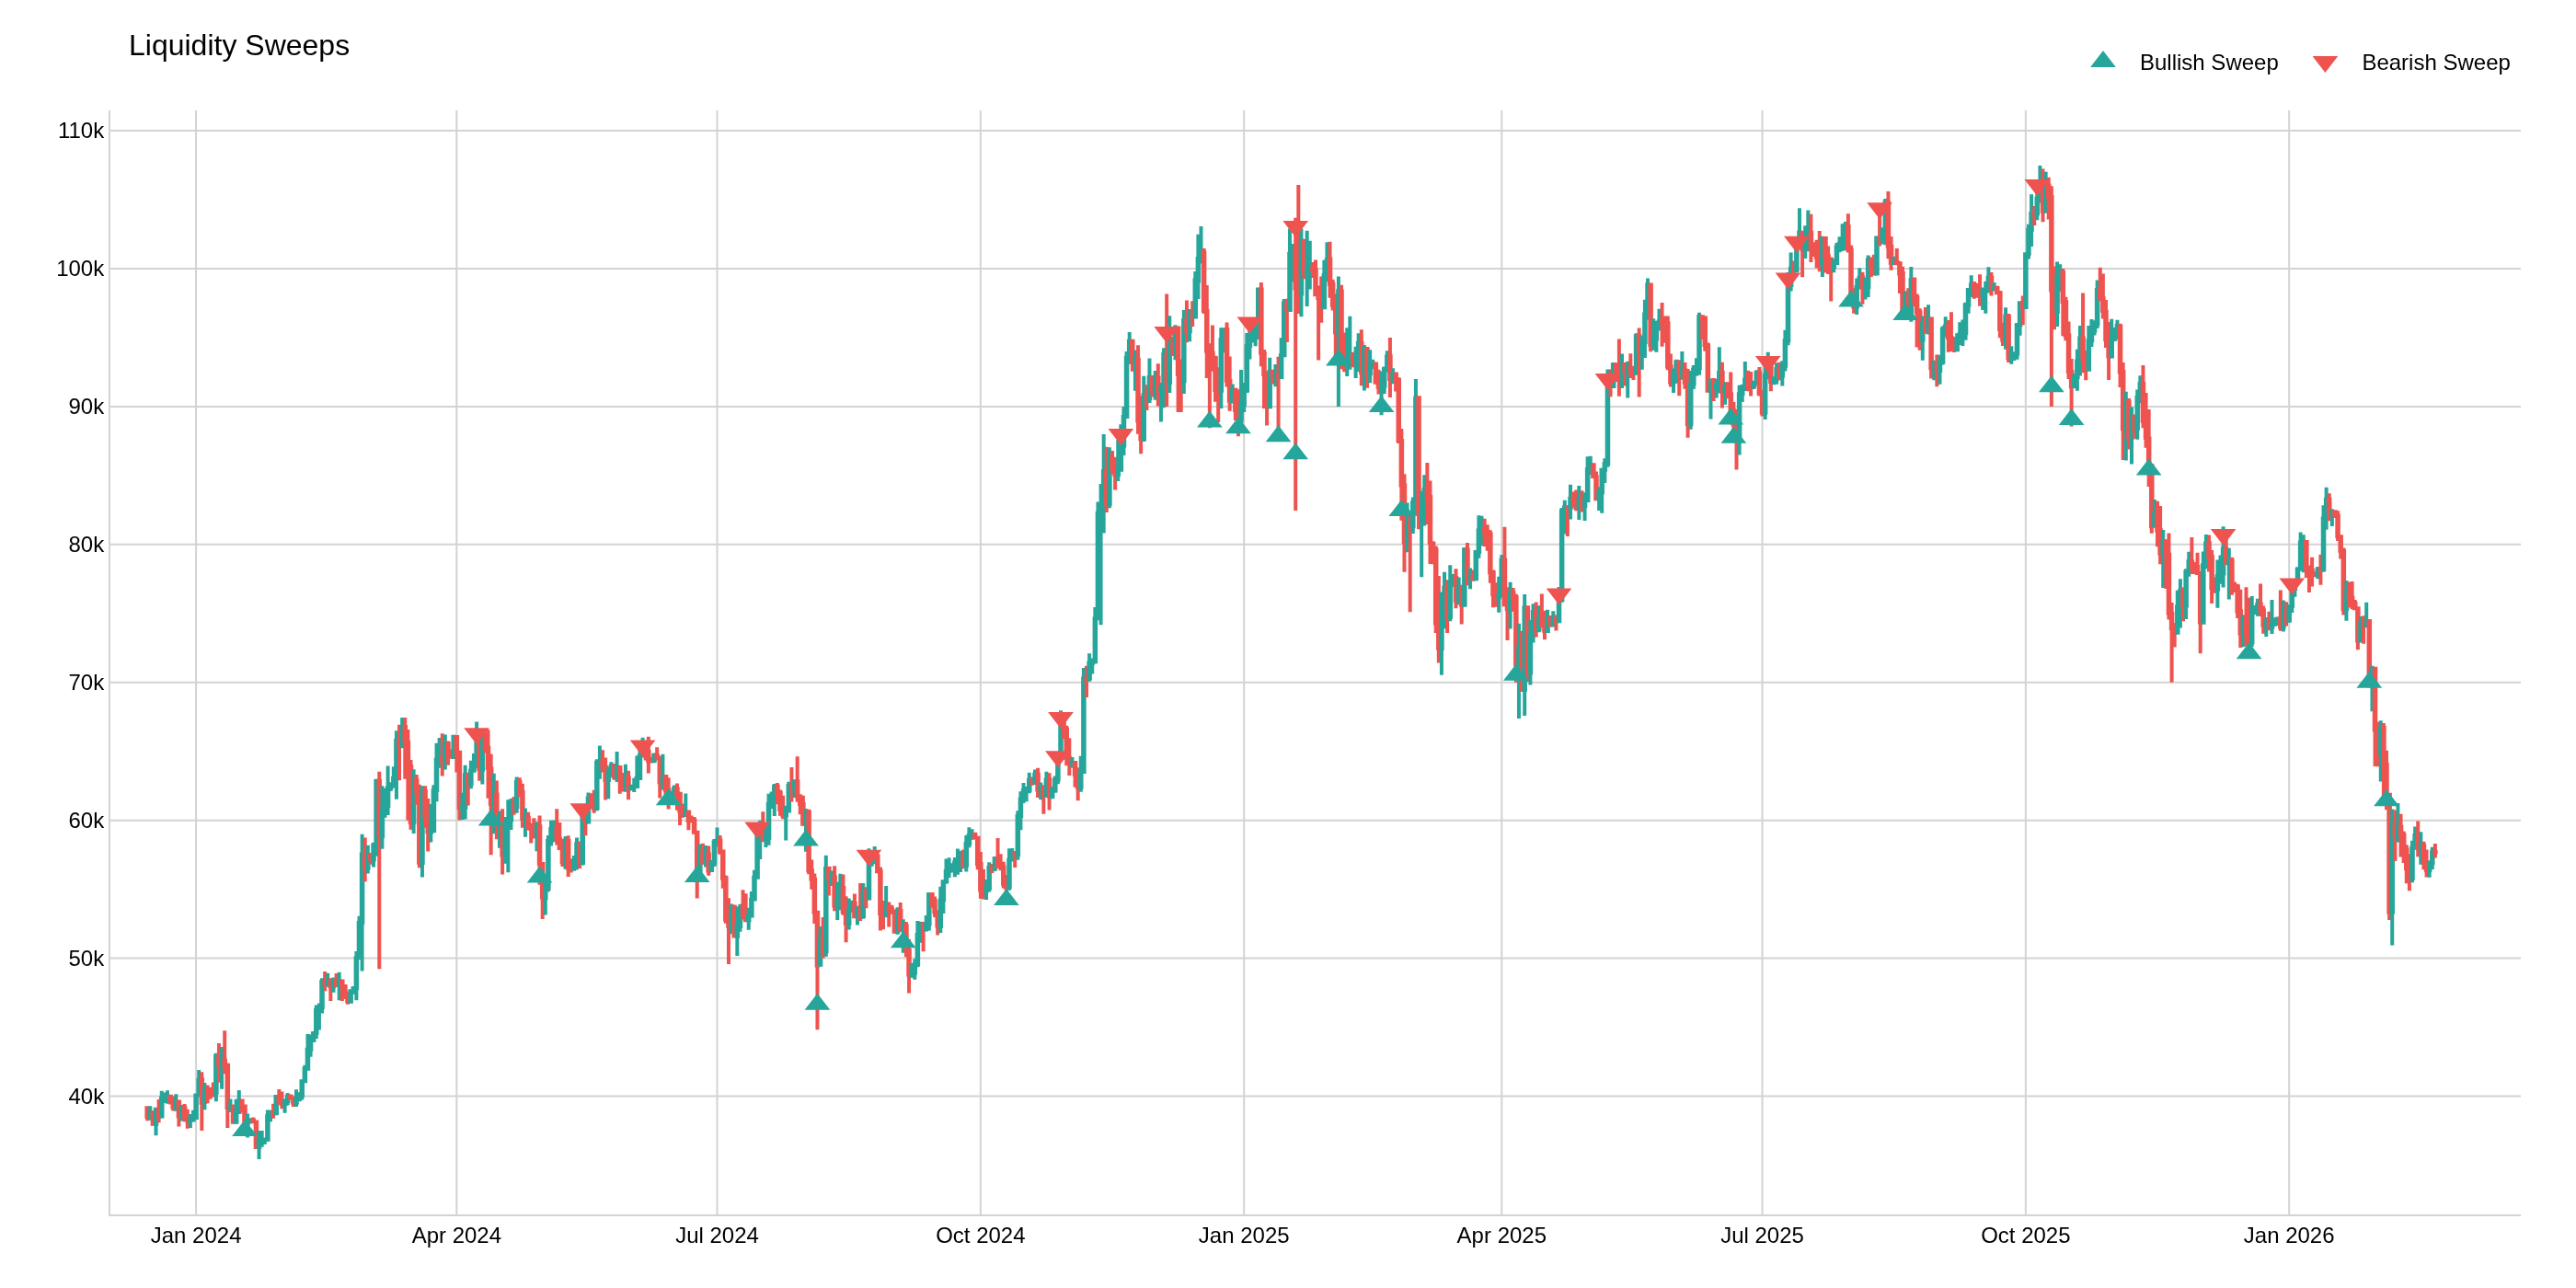
Liquidity Sweeps

Buyside & Sellside Liquidity
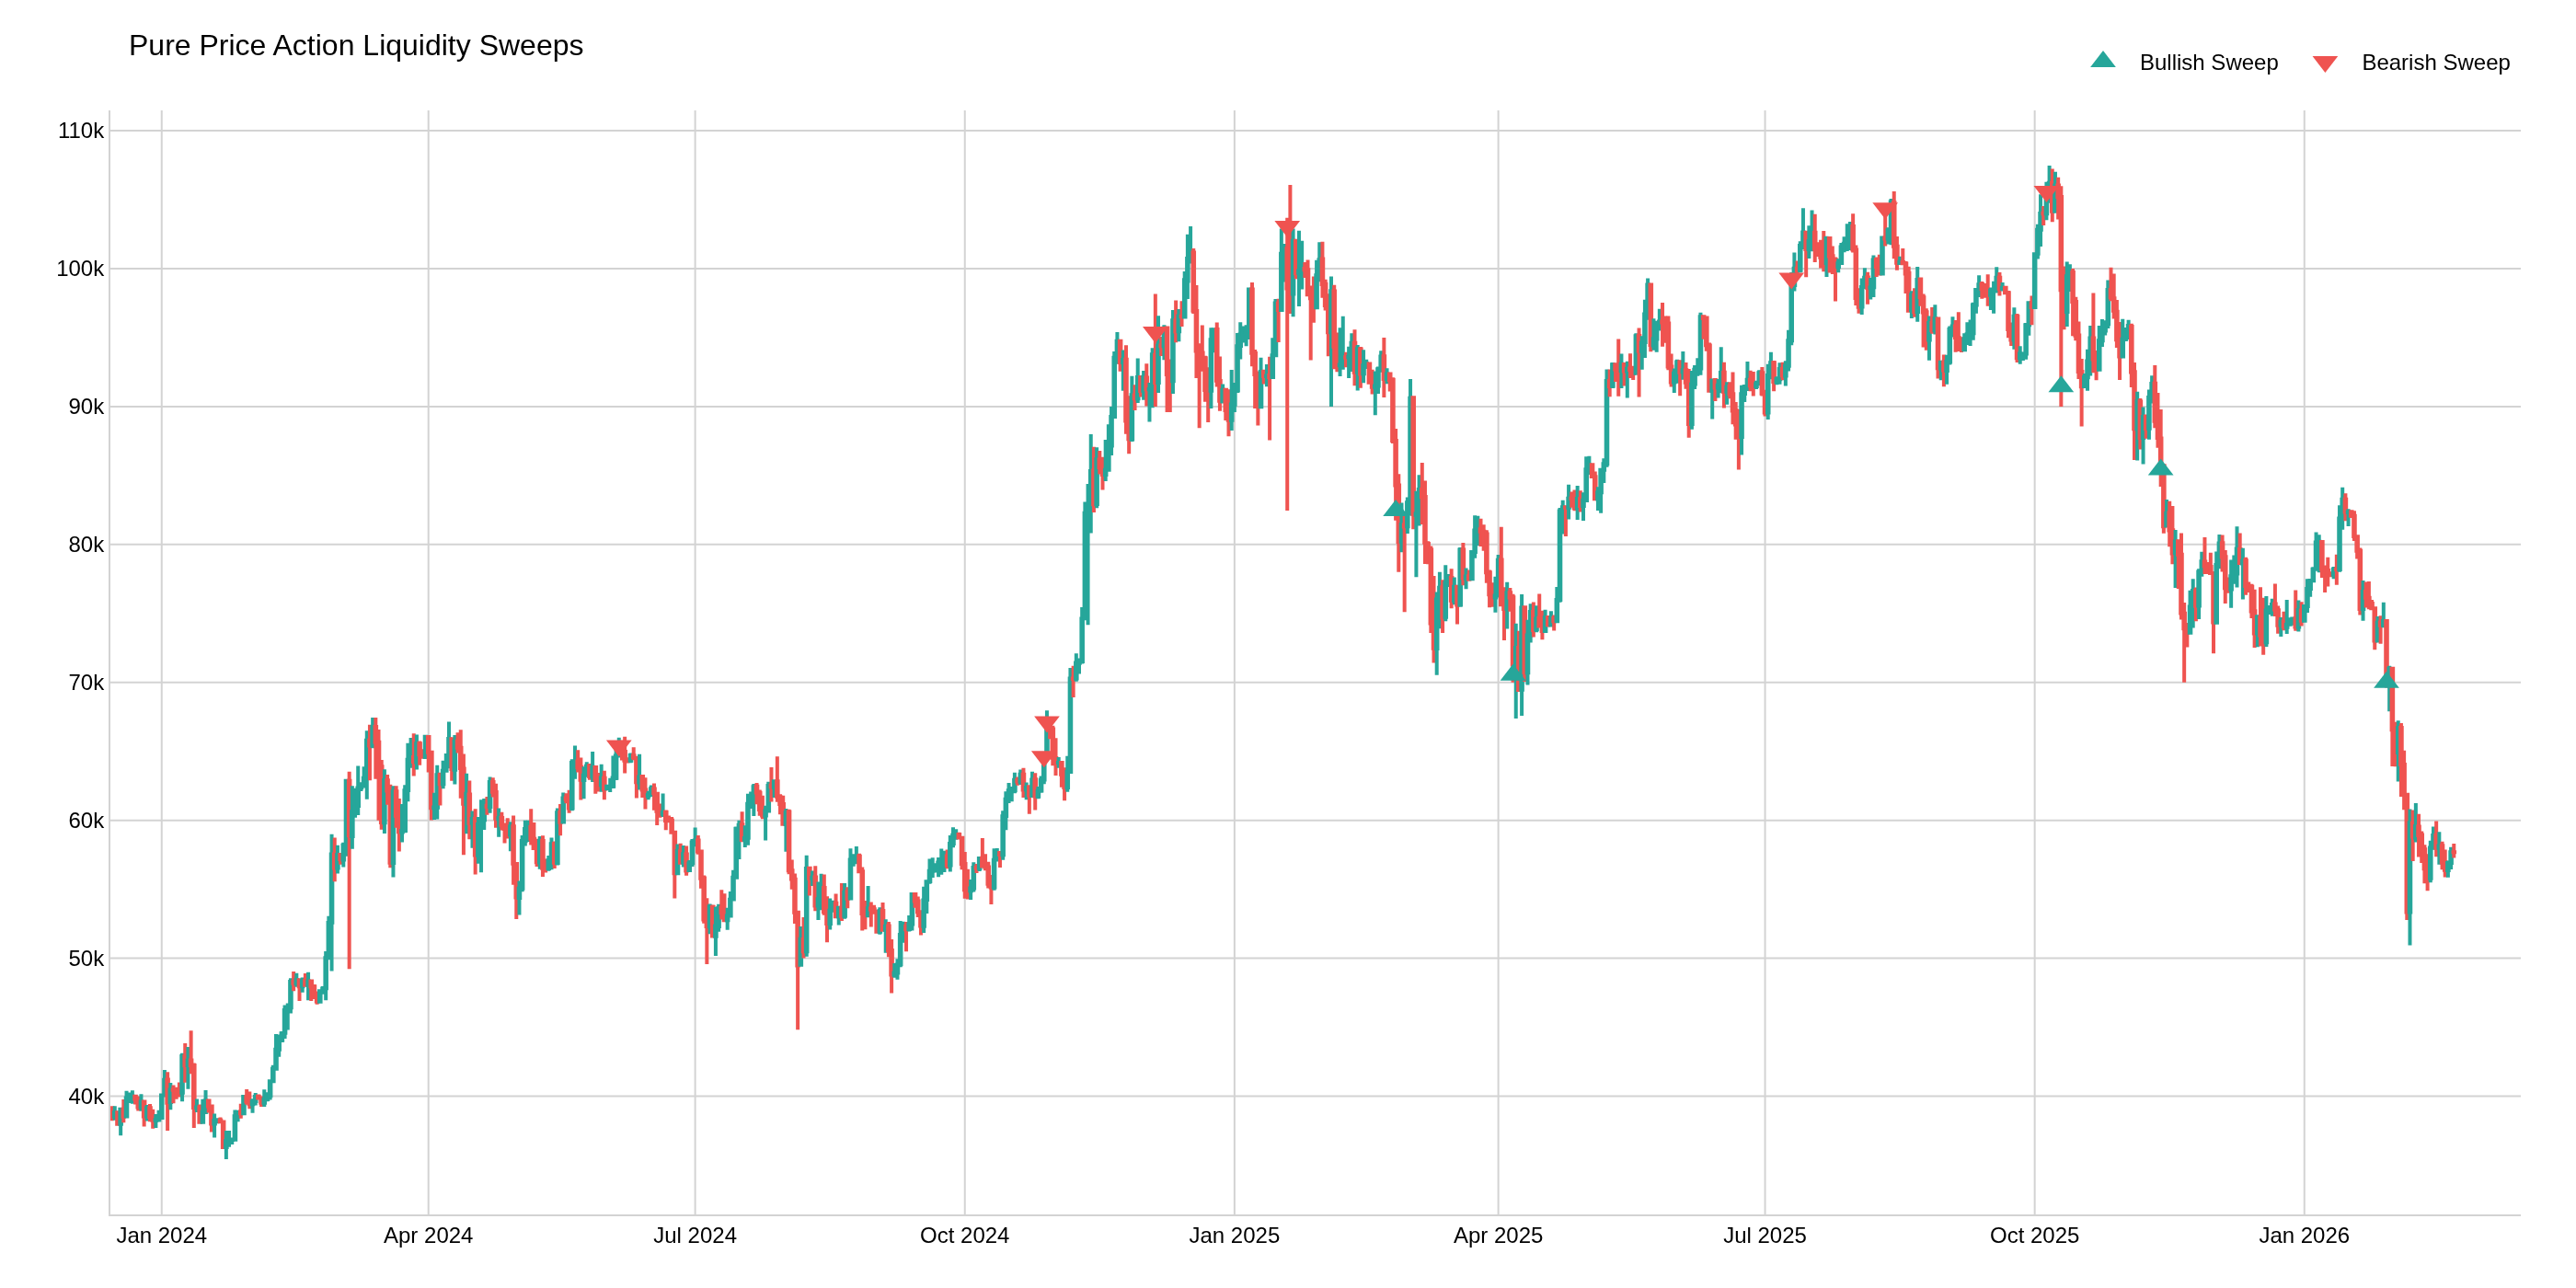
Pure Price Action Liquidity Sweeps
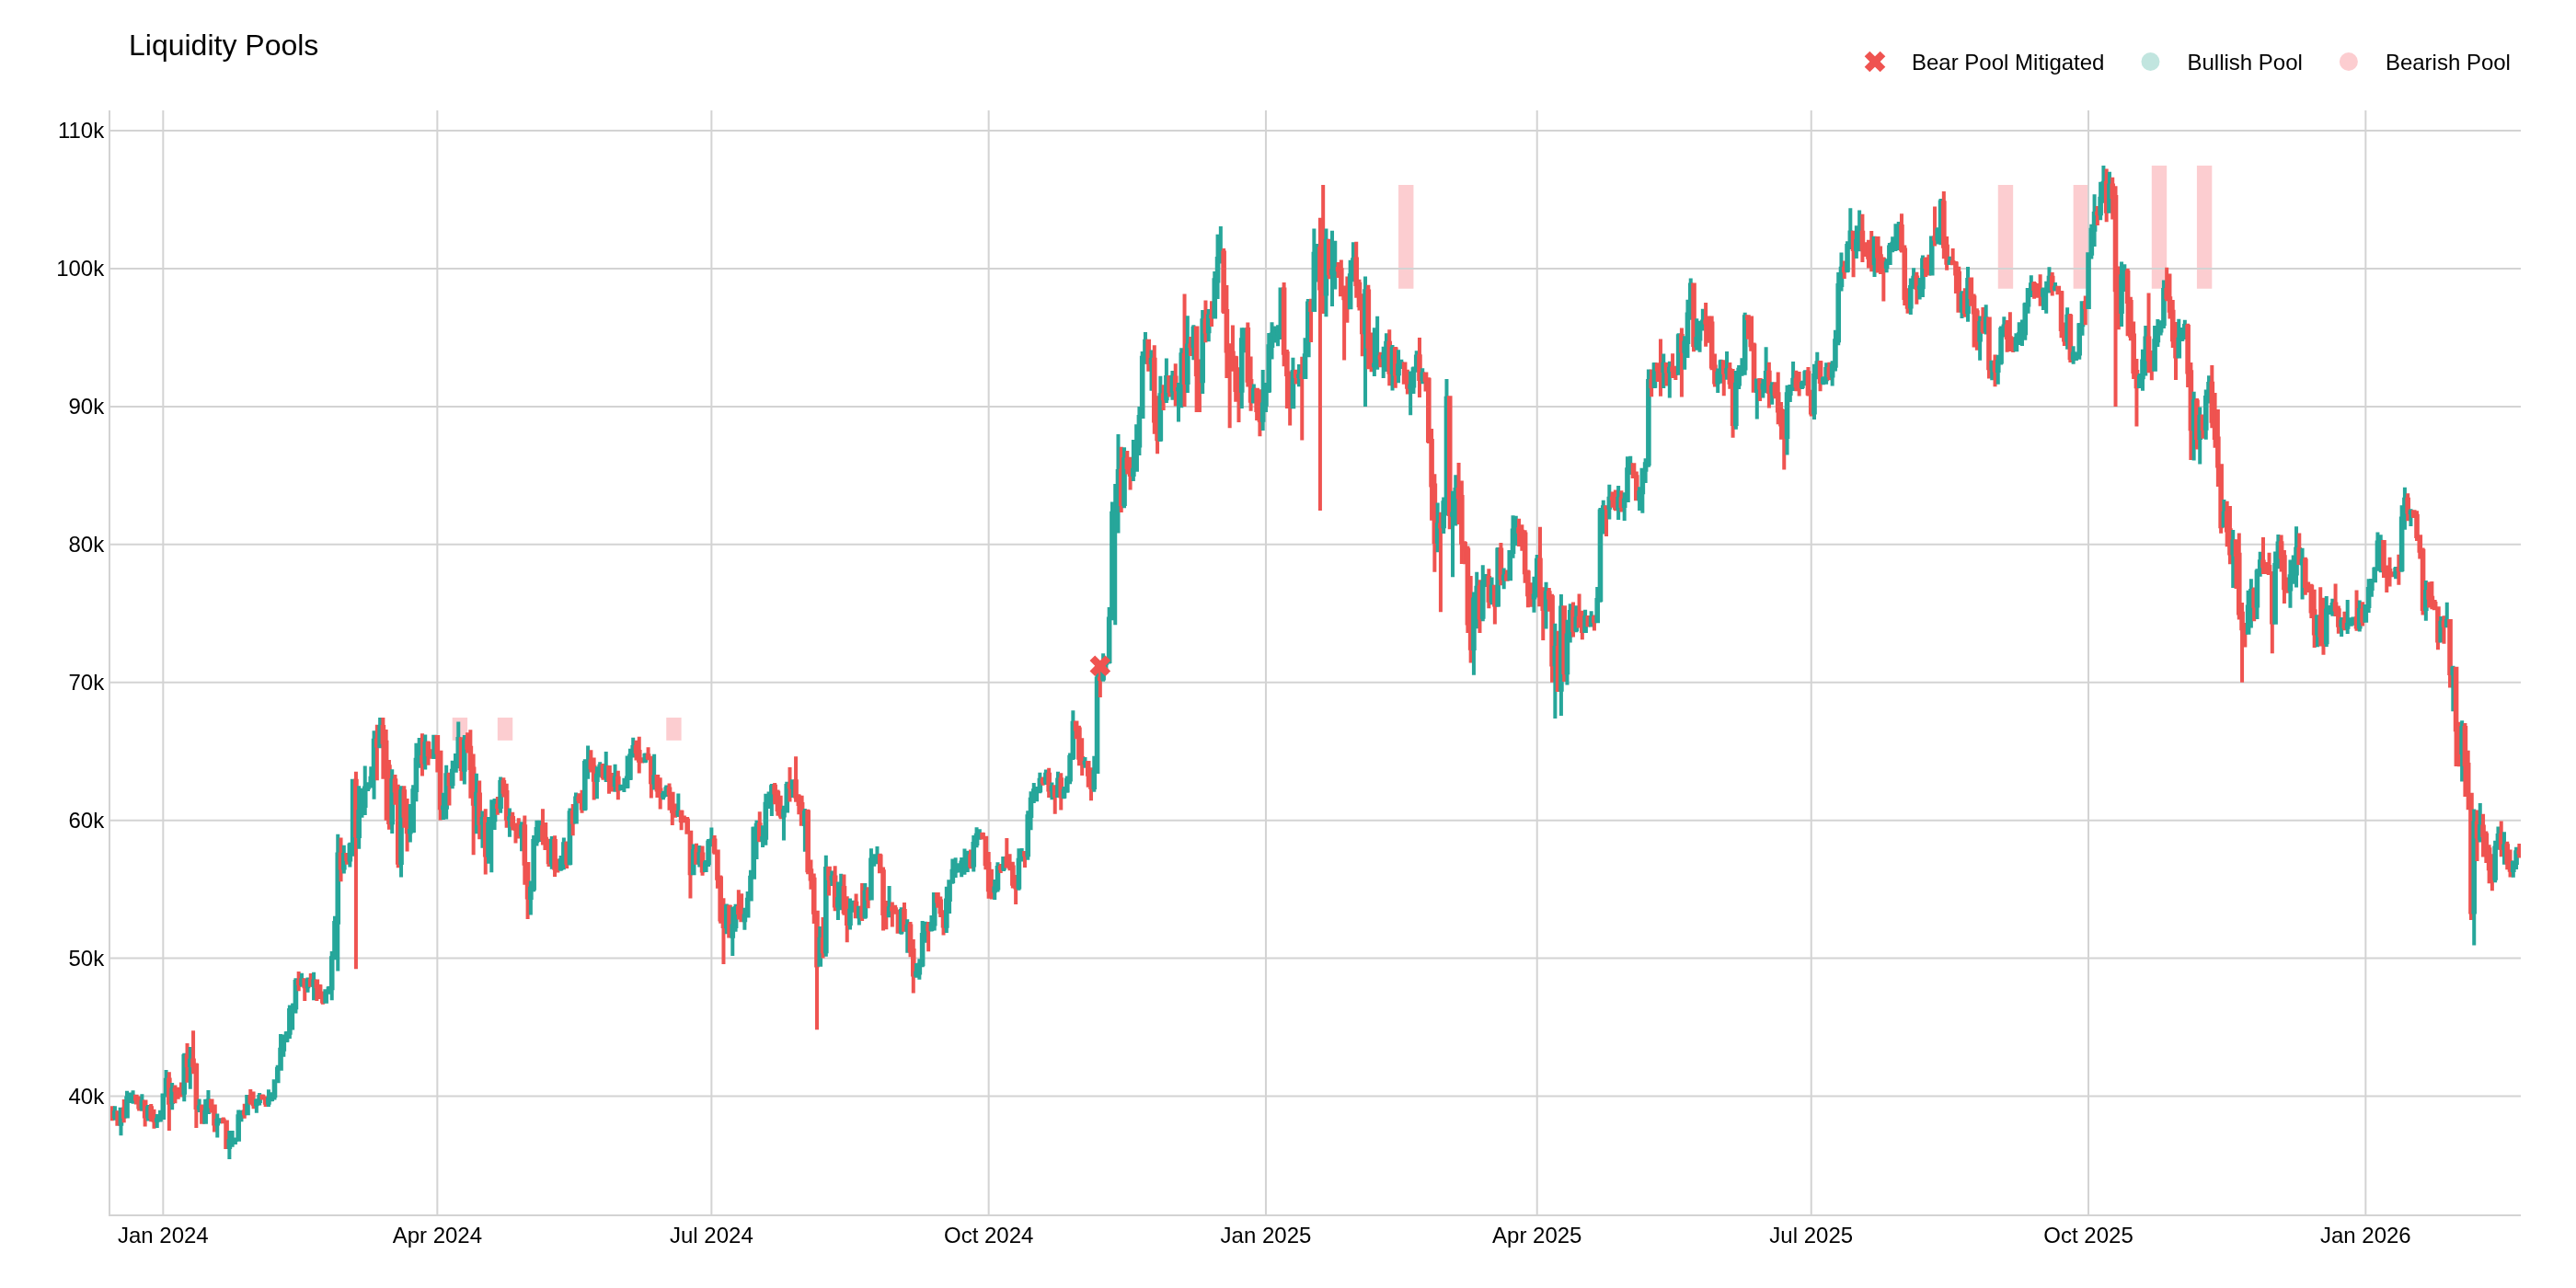
Liquidity Pools
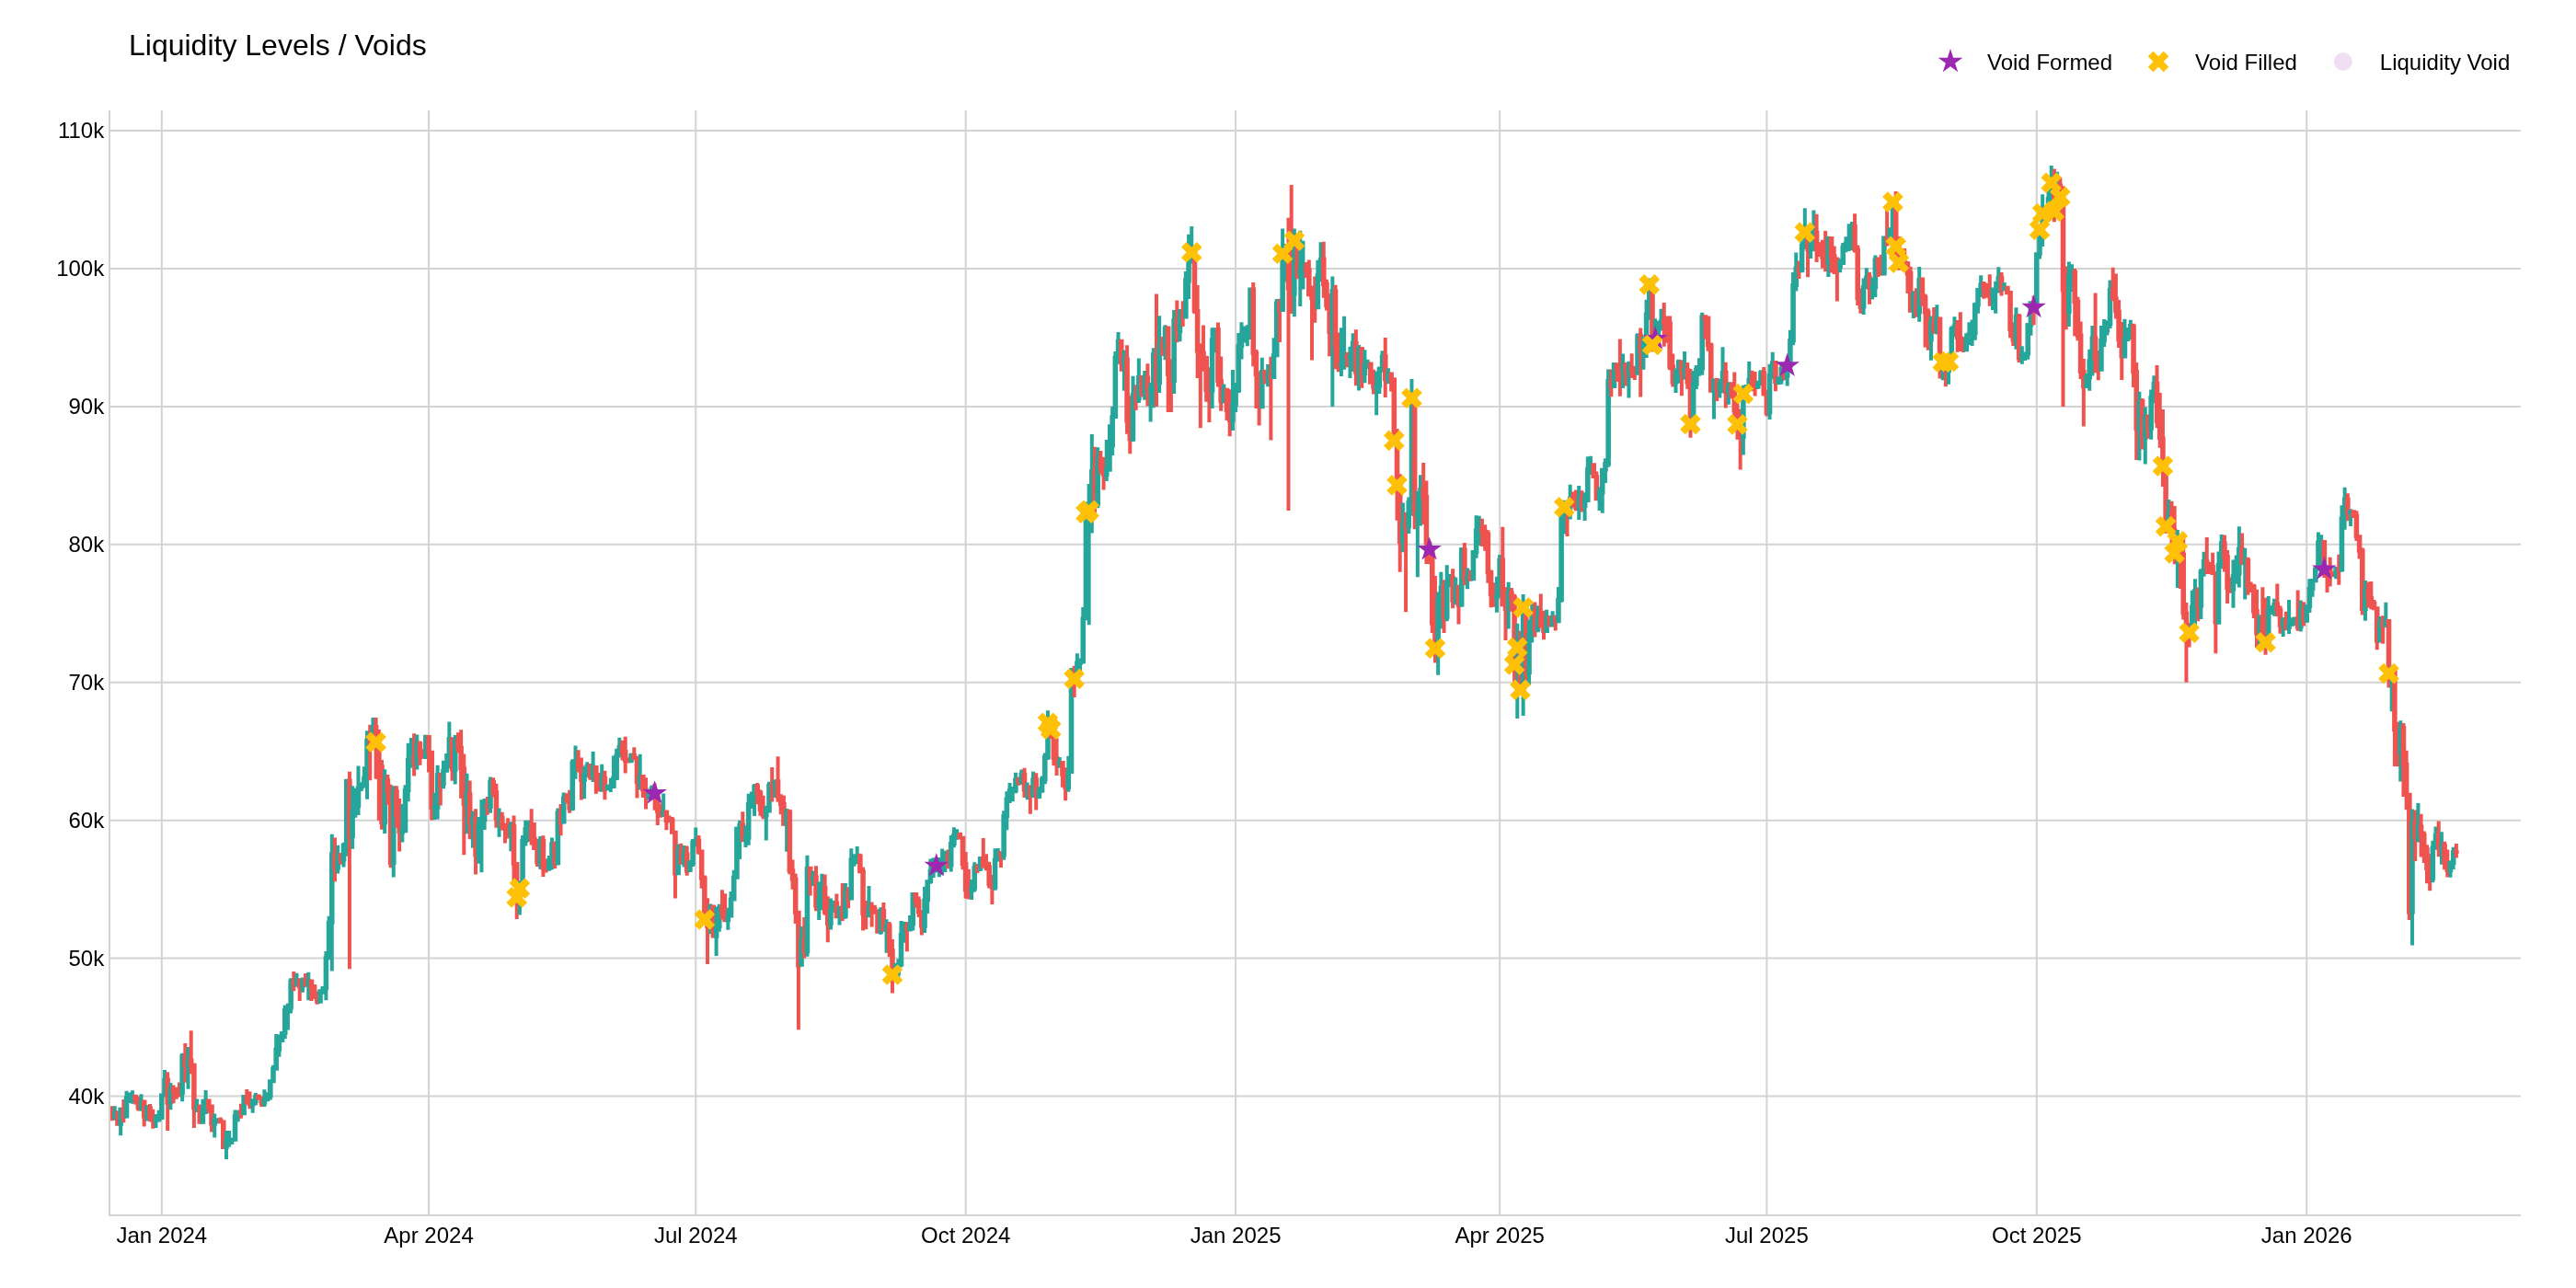
Liquidity Levels / Voids (VP)
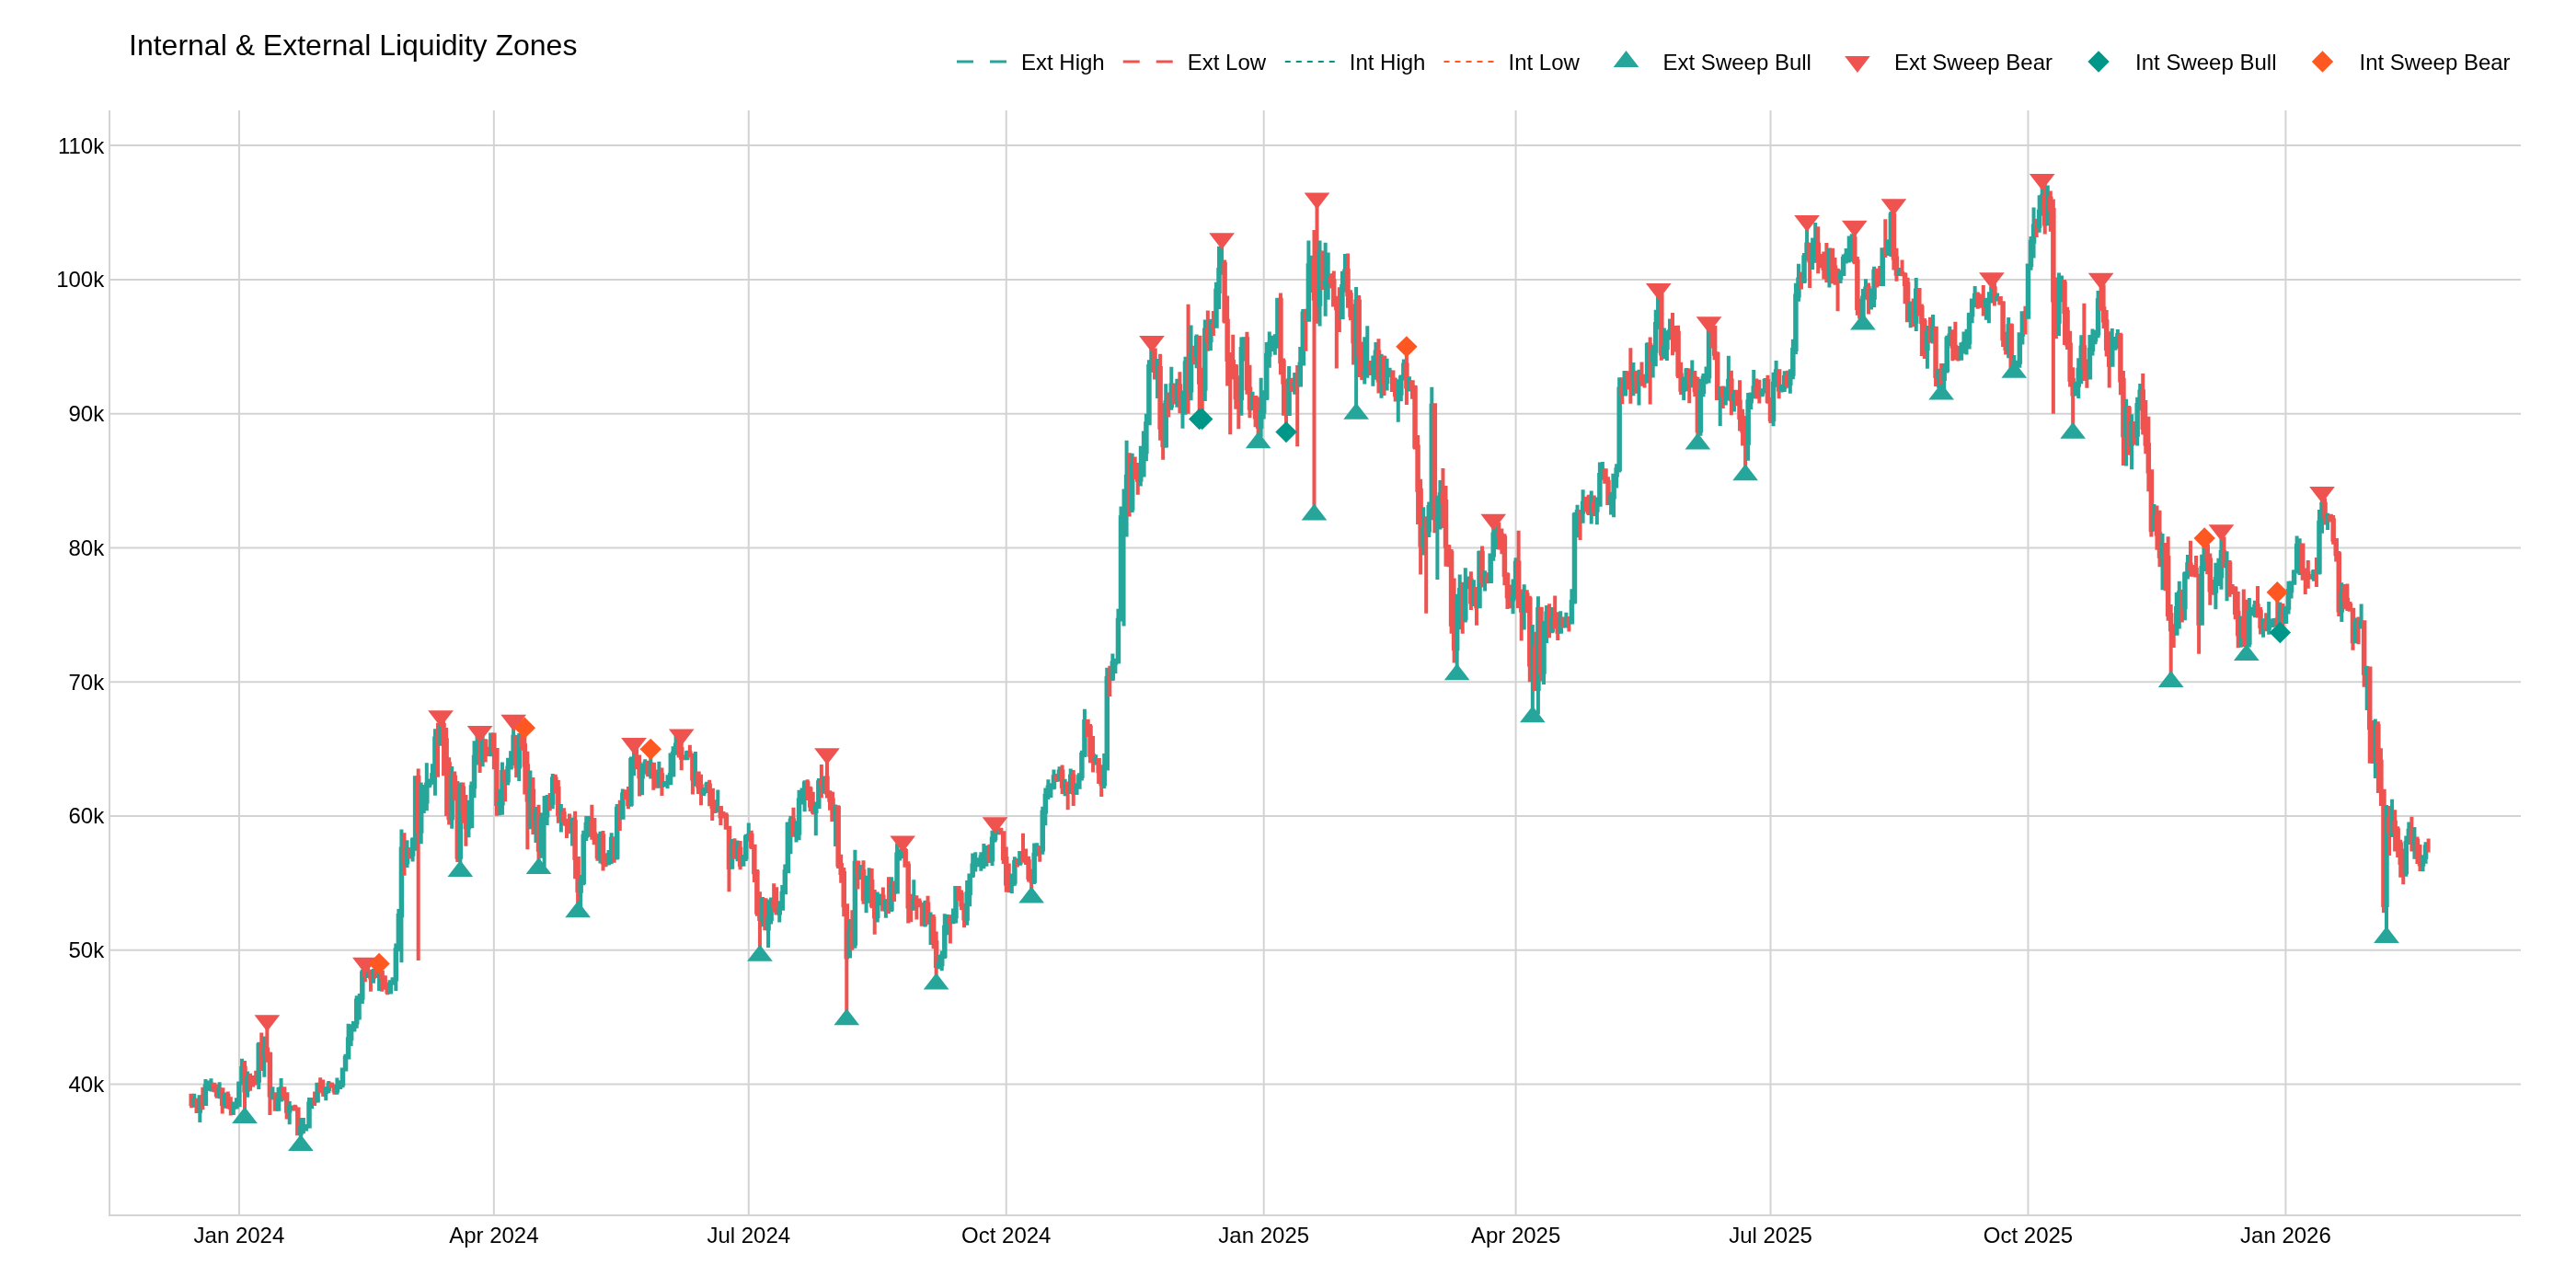
Internal & External Liquidity Zones
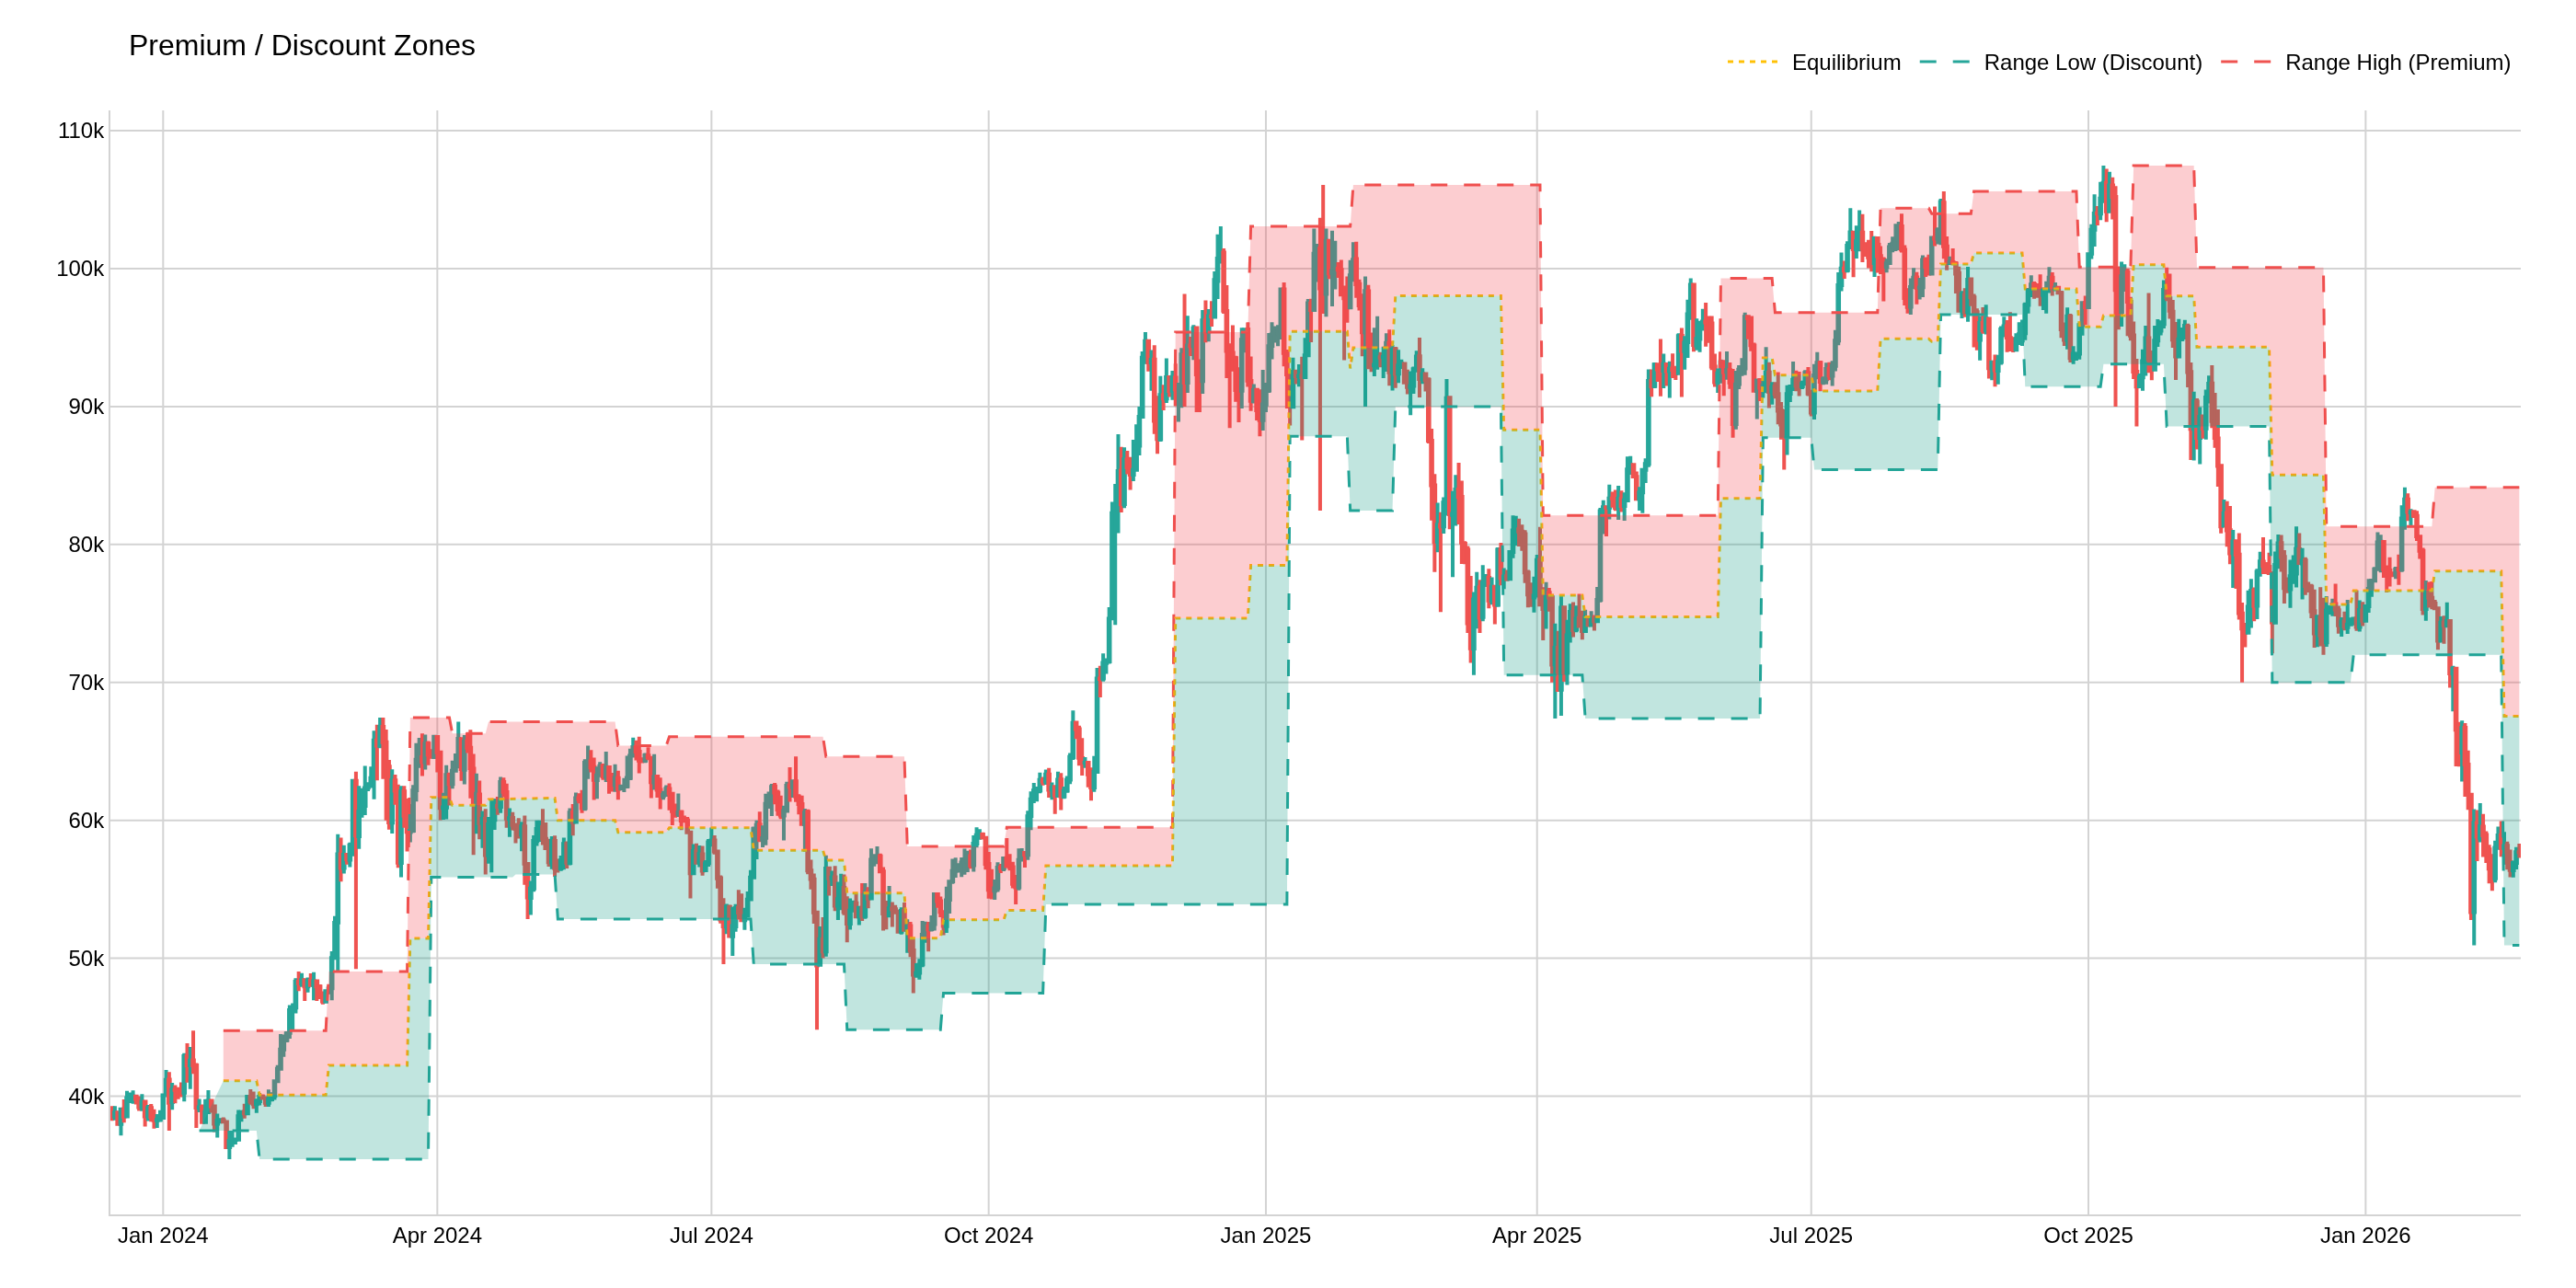
Premium / Discount Zones
Indicators at a glance
| Indicator | Type | Warmup | Lag | When to use |
|---|---|---|---|---|
| Fibonacci Retracement | 🟢 Real-time | 2 bars | 0 bars | Compute static retracement levels (23.6%, 38.2%, 50%, 61.8%, 78.6%) between a swing high and low. Use it to identify potential support/resistance zones during pullbacks in a trending market. |
| Golden Zone | 🔴 Lagging | length bars | ≈ length / 2 bars | Highlights the 61.8%-78.6% Fibonacci zone — the strongest retracement area. Use it as a high-probability entry zone during pullbacks. |
| Golden Zone Signal | 🟢 Real-time | Same as Golden Zone (length bars) | 0 bars | Generates buy/sell signals when price enters or exits the Golden Zone. Use it as a trigger alongside the Golden Zone overlay for systematic entries. |
| Fair Value Gap (FVG) | 🟢 Real-time | 3 bars | 0 bars | Detects 3-candle imbalance patterns where institutional order flow left a gap. Use FVGs as high-probability zones where price tends to return to rebalance. |
| Order Blocks | 🟢 Real-time | 2 × swing_length + 1 bars | ≈ swing_length bars after the pivot | Identifies the last opposing candle before a strong move — the footprint of institutional orders. Use order blocks as support/resistance zones for entries with tight stops. |
| Breaker Blocks | 🟢 Real-time | 2 × swing_length + 1 bars | ≈ swing_length bars after the pivot | Former order blocks that have been broken and flipped. When bulls fail, their order block becomes bearish resistance (and vice versa). Use them for continuation entries after a market-structure shift. |
| Mitigation Blocks | 🟢 Real-time | 2 × swing_length + 1 bars | ≈ swing_length bars after the pivot | The first same-direction candle in an impulse leg leading to a market-structure shift. Use them as precision entry zones — tighter than order blocks but with a higher hit rate. |
| Rejection Blocks | 🟢 Real-time | 2 × swing_length + 1 bars | ≈ swing_length bars after the pivot | Candles with large wicks at confirmed swing points, showing price rejection. Use them to identify levels where price was strongly pushed back and may react again. |
| Optimal Trade Entry (OTE) | 🟢 Real-time | 2 × swing_length + 1 bars | ≈ swing_length bars after the pivot | Fibonacci retracement of an impulse leg after a market-structure shift. Use OTE to time entries at the best risk/reward zone within a confirmed move. |
| Market Structure Break | 🟢 Real-time | 2 × pivot_length + 1 bars | ≈ pivot_length bars after the pivot | Detects when price breaks a confirmed pivot high/low with momentum. Use it to identify trend changes and potential reversal points. |
| Market Structure CHoCH/BOS | 🟢 Real-time | 2 × length + 1 bars | ≈ length bars after the fractal | Distinguishes between Change of Character (CHoCH) and Break of Structure (BOS). CHoCH signals a potential reversal; BOS confirms trend continuation. Essential for SMC/ICT trading. |
| Liquidity Sweeps | 🟢 Real-time | 2 × swing_length + 1 bars | ≈ swing_length bars after the swing | Detects when price wicks through a swing point and reverses — a classic liquidity grab. Use it to spot institutional stop hunts and trade the reversal. |
| Buyside & Sellside Liquidity | 🟢 Real-time | 2 × detection_length + 1 bars | ≈ detection_length bars after the pivot | Maps clusters of resting liquidity above highs (buyside) and below lows (sellside). Use it to anticipate where price is likely to be drawn toward next. |
| Pure Price Action Liquidity Sweeps | 🟢 Real-time | depth-dependent (varies by fractal depth) | depth-dependent | A multi-depth fractal approach to liquidity sweep detection. Use it when you want to detect sweeps across different structural depths. |
| Liquidity Pools | 🟢 Real-time | ≥ contact_count × gap_bars bars | depends on contact_count + gap_bars | Zones where price wicks have touched multiple times, indicating resting orders. Use them to identify high-probability reversal or acceleration zones. |
| Liquidity Levels / Voids (VP) | 🟢 Real-time | detection_length bars | ≈ detection_length bars | Highlights volume-profile voids — price areas with little trading activity. Price tends to move quickly through voids. Use them to spot potential fast-move zones. |
| Internal & External Liquidity Zones | 🟢 Real-time | 2 × external_pivot_length + 1 bars | ≈ external_pivot_length bars | Distinguishes between internal (range-bound) and external (breakout) liquidity. Use it to understand whether price is targeting internal or external levels. |
| Premium / Discount Zones | 🟢 Real-time | 2 × swing_length + 1 bars | ≈ swing_length bars after the swing | Divides the current range into premium (upper) and discount (lower) zones. Buy in discount, sell in premium — the core SMC/ICT framework for directional bias. |
Detailed descriptions
Fibonacci Retracement
🟢 Real-time
Warmup: 2 bars (default: 2 bars)
Compute static retracement levels (23.6%, 38.2%, 50%, 61.8%, 78.6%) between a swing high and low. Use it to identify potential support/resistance zones during pullbacks in a trending market.
Golden Zone
🔴 Lagging — ≈
length / 2barsWarmup:
lengthbars (default: 60 bars (length=60))
Highlights the 61.8%-78.6% Fibonacci zone — the strongest retracement area. Use it as a high-probability entry zone during pullbacks.
Golden Zone Signal
🟢 Real-time
Warmup: Same as Golden Zone (
lengthbars) (default: 60 bars (length=60))
Generates buy/sell signals when price enters or exits the Golden Zone. Use it as a trigger alongside the Golden Zone overlay for systematic entries.
Fair Value Gap (FVG)
🟢 Real-time
Warmup: 3 bars (default: 3 bars)
Detects 3-candle imbalance patterns where institutional order flow left a gap. Use FVGs as high-probability zones where price tends to return to rebalance.
Order Blocks
🟢 Real-time — ≈
swing_lengthbars after the pivotWarmup:
2 × swing_length + 1bars (default: 21 bars (swing_length=10))
Identifies the last opposing candle before a strong move — the footprint of institutional orders. Use order blocks as support/resistance zones for entries with tight stops.
Breaker Blocks
🟢 Real-time — ≈
swing_lengthbars after the pivotWarmup:
2 × swing_length + 1bars (default: 11 bars (swing_length=5))
Former order blocks that have been broken and flipped. When bulls fail, their order block becomes bearish resistance (and vice versa). Use them for continuation entries after a market-structure shift.
Mitigation Blocks
🟢 Real-time — ≈
swing_lengthbars after the pivotWarmup:
2 × swing_length + 1bars (default: 11 bars (swing_length=5))
The first same-direction candle in an impulse leg leading to a market-structure shift. Use them as precision entry zones — tighter than order blocks but with a higher hit rate.
Rejection Blocks
🟢 Real-time — ≈
swing_lengthbars after the pivotWarmup:
2 × swing_length + 1bars (default: 11 bars (swing_length=5))
Candles with large wicks at confirmed swing points, showing price rejection. Use them to identify levels where price was strongly pushed back and may react again.
Optimal Trade Entry (OTE)
🟢 Real-time — ≈
swing_lengthbars after the pivotWarmup:
2 × swing_length + 1bars (default: 11 bars (swing_length=5))
Fibonacci retracement of an impulse leg after a market-structure shift. Use OTE to time entries at the best risk/reward zone within a confirmed move.
Market Structure Break
🟢 Real-time — ≈
pivot_lengthbars after the pivotWarmup:
2 × pivot_length + 1bars (default: 15 bars (pivot_length=7))
Detects when price breaks a confirmed pivot high/low with momentum. Use it to identify trend changes and potential reversal points.
Market Structure CHoCH/BOS
🟢 Real-time — ≈
lengthbars after the fractalWarmup:
2 × length + 1bars (default: 11 bars (length=5))
Distinguishes between Change of Character (CHoCH) and Break of Structure (BOS). CHoCH signals a potential reversal; BOS confirms trend continuation. Essential for SMC/ICT trading.
Liquidity Sweeps
🟢 Real-time — ≈
swing_lengthbars after the swingWarmup:
2 × swing_length + 1bars (default: 11 bars (swing_length=5))
Detects when price wicks through a swing point and reverses — a classic liquidity grab. Use it to spot institutional stop hunts and trade the reversal.
Buyside & Sellside Liquidity
🟢 Real-time — ≈
detection_lengthbars after the pivotWarmup:
2 × detection_length + 1bars (default: 15 bars (detection_length=7))
Maps clusters of resting liquidity above highs (buyside) and below lows (sellside). Use it to anticipate where price is likely to be drawn toward next.
Pure Price Action Liquidity Sweeps
🟢 Real-time — depth-dependent
Warmup: depth-dependent (varies by fractal depth) (default: Varies — deeper fractals need more bars)
A multi-depth fractal approach to liquidity sweep detection. Use it when you want to detect sweeps across different structural depths.
Liquidity Pools
🟢 Real-time — depends on contact_count + gap_bars
Warmup: ≥
contact_count × gap_barsbars (default: Varies (contact_count=2))
Zones where price wicks have touched multiple times, indicating resting orders. Use them to identify high-probability reversal or acceleration zones.
Liquidity Levels / Voids (VP)
🟢 Real-time — ≈
detection_lengthbarsWarmup:
detection_lengthbars (default: Depends on detection_length)
Highlights volume-profile voids — price areas with little trading activity. Price tends to move quickly through voids. Use them to spot potential fast-move zones.
Internal & External Liquidity Zones
🟢 Real-time — ≈
external_pivot_lengthbarsWarmup:
2 × external_pivot_length + 1bars (default: 21 bars (external_pivot_length=10))
Distinguishes between internal (range-bound) and external (breakout) liquidity. Use it to understand whether price is targeting internal or external levels.
Premium / Discount Zones
🟢 Real-time — ≈
swing_lengthbars after the swingWarmup:
2 × swing_length + 1bars (default: 21 bars (swing_length=10))
Divides the current range into premium (upper) and discount (lower) zones. Buy in discount, sell in premium — the core SMC/ICT framework for directional bias.